
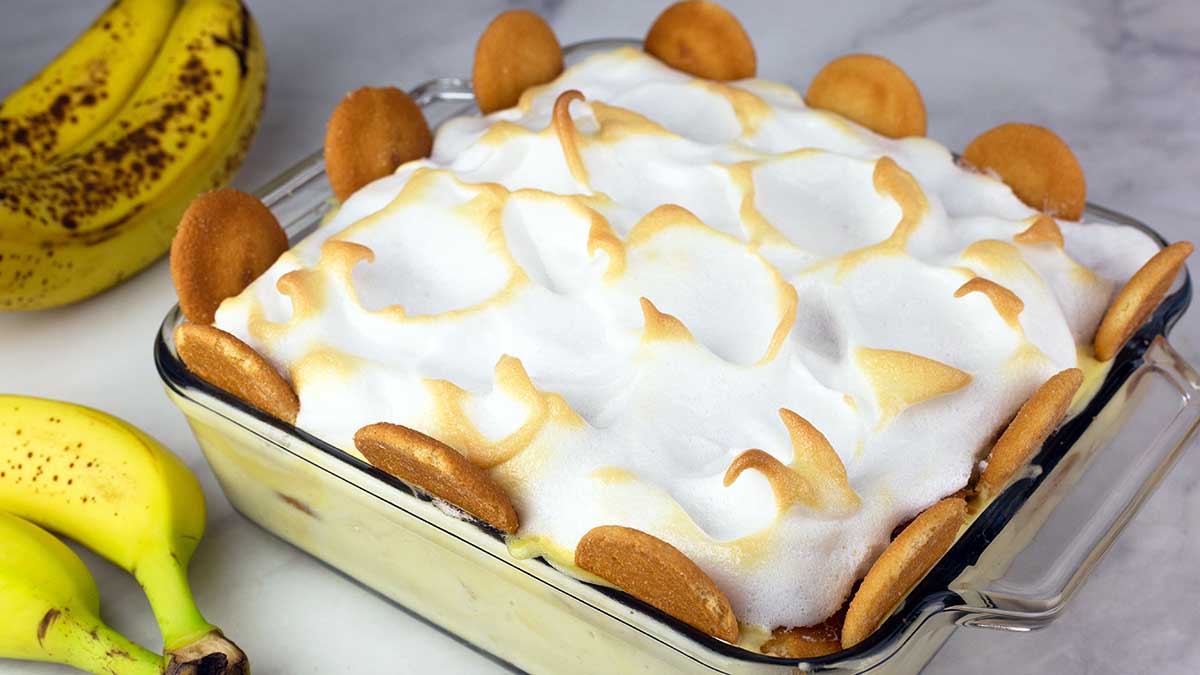
Layers of rich vanilla custard, bananas, and vanilla wafers topped with meringue is a dream dessert and one that is served up to family and friends with pride all across the United States. It is especially popular in the south and I would venture to say that this recipe is pretty close to a southern banana pudding recipe with a little twist.
My recipe is from scratch, except for the Nilla Wafers, but there isn't any right way or wrong way to make this recipe. I think it's perfect exactly the way I have written it, but if you prefer a whipped cream topping over the meringue, it's fine. If you don't want to make to make your own custard, use boxed pudding, it's fine. Mix and match the layers based on your comfort and taste preferences, but I urge you to try making at least one of the layers homemade. I'd probably pick the pudding as the most important to make yourself -- it really makes a difference in the flavor. You also might be surprised that making homemade vanilla pudding isn't hard and doesn't take that much longer than whipping up a box of pudding.
Would you like to save this recipe?
Even if you have never made a homemade banana pudding with meringue on top, don't worry! I'm going to walk you through step-by-step. It's so easy, I promise! If you are looking for more dessert ideas, check out the section below where I share some of my favorites!
Favorite Dessert Recipes
These dessert recipes are easy to make, crowd pleasers, and simply delicious!
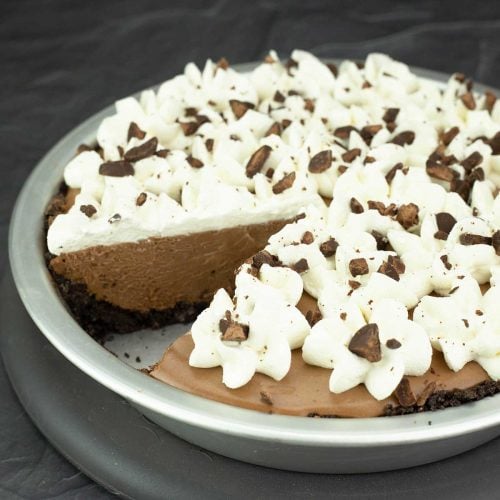
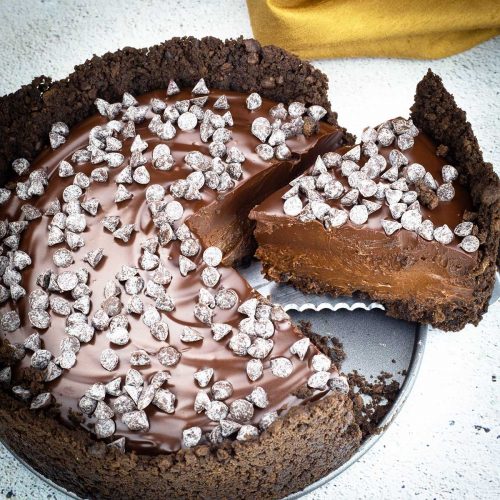
- No-Bake Chocolate Mousse Pie
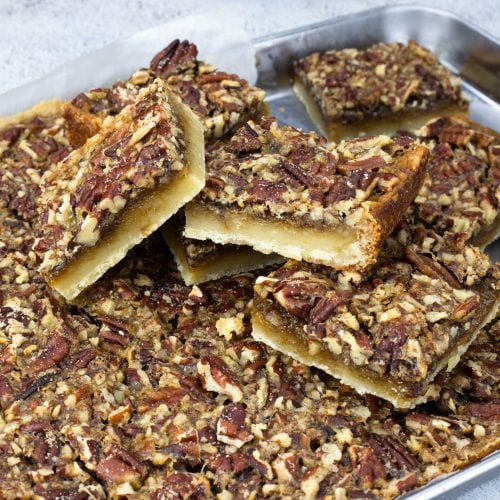
- Pecan Pie Bars
- Homemade Fudgy Brownies
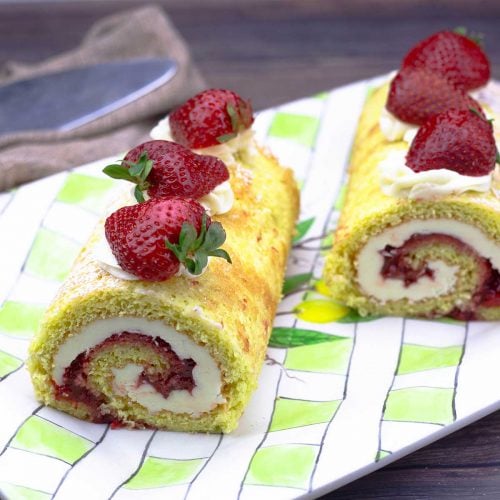
- Strawberry Roll Cake ~ Ninja Foodi Digital Oven or Regular Oven
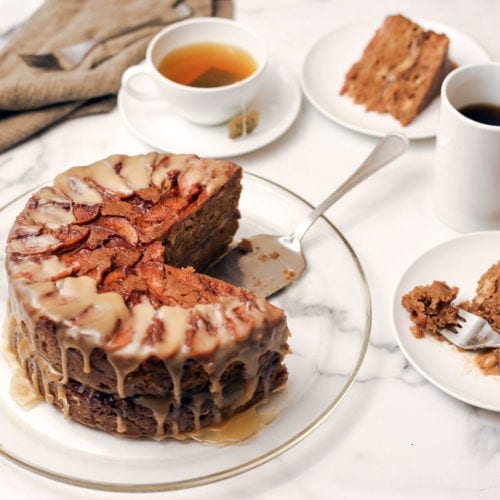
- Ninja Foodi Apple Cake with Caramel Glaze
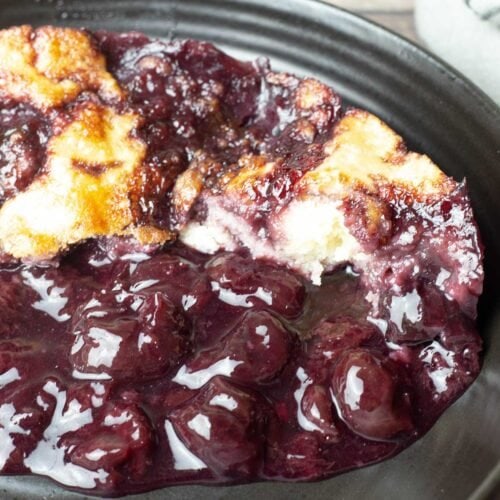
- Easy Cherry Cobbler (Ninja Foodi or Instant Pot Recipe)
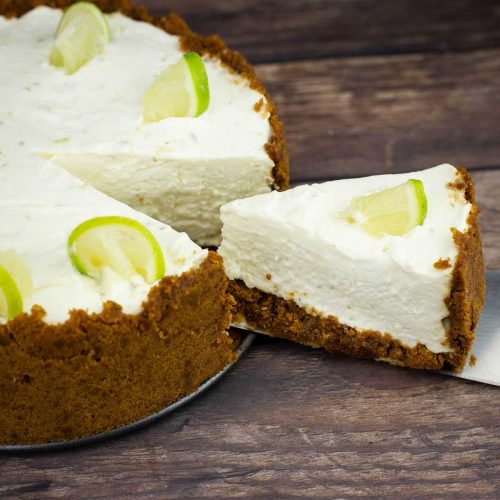
- EASY No-bake Key Lime Cheesecake
- Triple Chocolate Cheesecake ~ Pressure Cooker Recipe & Oven Directions Included

Frequently Asked Questions
Technically you can; however, I found it easier to make two batches rather than double the ingredients. It can be much harder to control the temperatures when you have double the ingredients. So, if you are not used to making homemade pudding, stick with single batches at first.
It should last a good 3 days covered in the fridge. I do find that the bananas give off liquid as they soften and, of course, they can turn brown if exposed to air, but these are more visual and textural issues, not issues that makes it unsafe to consume. I will also note that making the banana pudding the day before you plan on serving it really allows the bananas to infuse their flavor into the pudding.
You can also freeze banana pudding, but I would only do this with leftovers and not before you serve to guests because of texture issues when thawed. It's also important that you discard any leftovers that were at room temperature more than 2 hours.
A Little History on this Classic Southern Dessert
Banana Pudding is an iconic American dessert dating back to the 1800's and it has gone through many changes throughout the years. When it first was seen in Good Housekeeping way back in 1888, sponge cake was used instead of the vanilla cookies, but in the early 1920's was the first mention of using cookies instead of cake in a recipe, which were most likely homemade cookies. Some 20 years later was when Nabisco came out with Vanilla Wafers, which was later shortened to "Nilla Wafers."
Fun Fact
I always thought classic banana pudding was made with banana pudding. A few years ago, I started researching how to make homemade banana pudding and I was shocked that it's made with vanilla pudding. I couldn't even find a recipe for banana pudding like we see for vanilla pudding or chocolate pudding. I think I'll have to experiment with make a creamy pudding that has a banana flavor!
Ingredients & Substitutions
Vanilla Wafers
I used Nabisco Nilla Wafers in this recipe, but I've also used Aldi brand and found no difference. In fact, I liked the crunch of the Aldi brand better. Any vanilla flavored cookie will work in this recipe or you can use sponge cake instead of the cookie layers.
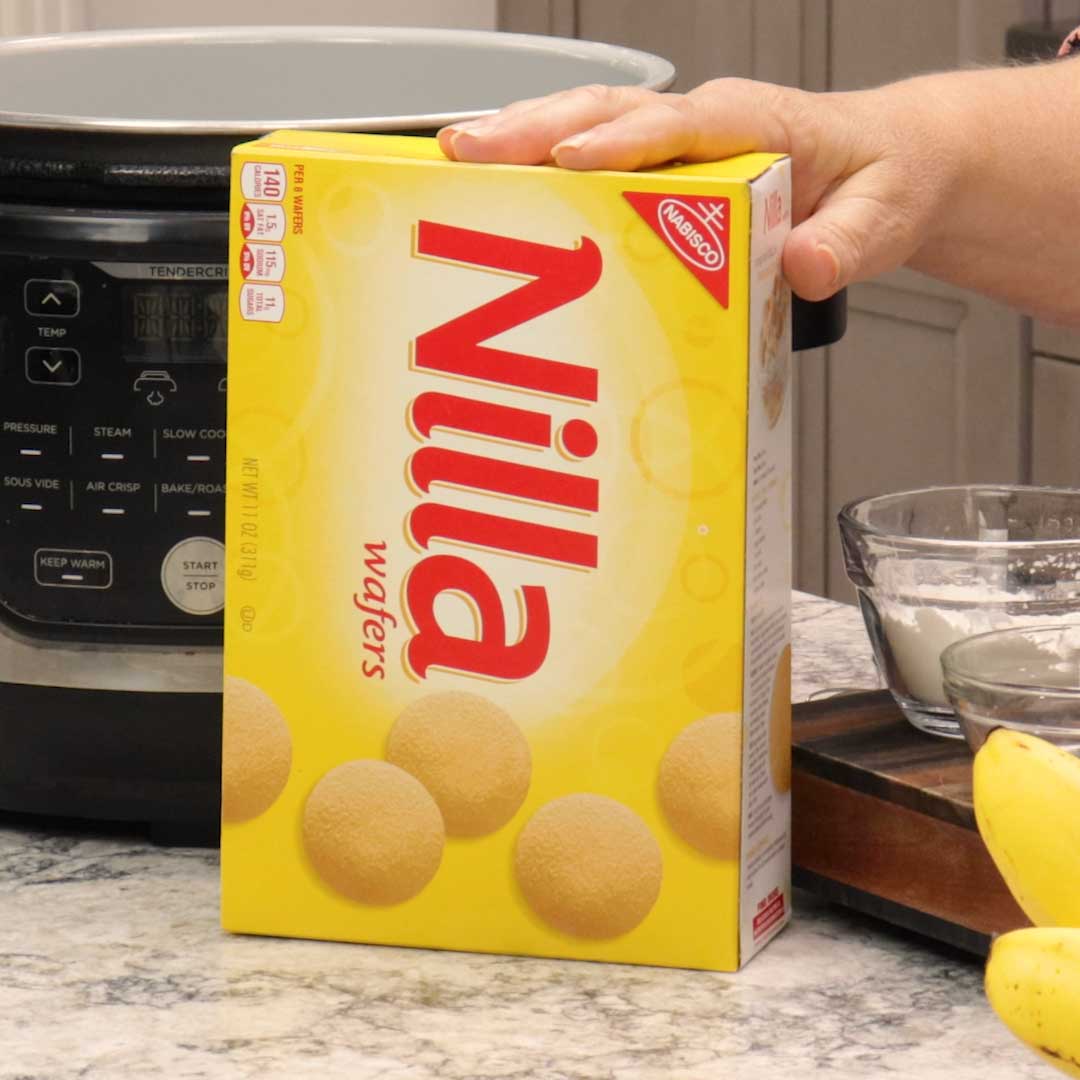
You can also skip the cookies, if you want. I do think it's adds a nice texture, almost cake like, but they certainly aren't necessary.
Bananas
I use between 3 and 4 bananas in this recipe and it is best to use ripe bananas that are bright yellow. You don't want them to be green or they aren't sweet enough, but you also don't want to use bananas that have browning skins because they are too soft and they tend to release too much liquid into the pudding, which affects the texture.
If you don't like bananas, you can omit them. Obviously it won't be banana pudding, but it will be delicious. If you wanted to substitute a different fruit like strawberries or raspberries you absolutely can, just call it trifle.
Homemade Custard & Whipped Cream
Personally, I think this is what makes this version of southern style banana pudding so delicious and I really hope you make the custard and fold in the cream. However, if you don't want to do that, you can use boxed pudding and add in some Cool Whip or skip the Cool Whip. You can also take a short cut and mix the dry instant pudding mix into the Cool Whip to make a light and tasty filling. I do this in my pistachio cake and it's amazing!
I will say that the amount of sugar in this recipe doesn't result in a super sweet pudding, so if you have a sweet tooth and really like a sweet pudding I would add another ¼ cup of sugar to the custard.
You can definitely use sugar free pudding mix or make your custard sugar free by adding the equivalent of your favorite artificial sweetener in place of the sugar in the recipe.
You will need a total of 4 cups of pudding for an 8X8 size pan.
Meringue Topping
The Meringue topping is what dreams are made of. It's that good. Imagine biting into a cloud of deliciousness, that's meringue. It's surprisingly easy to do, so I hope you give it a try!
If you don't want to make the meringue topping, you can certainly top it with homemade whipped cream or Cool Whip.
What Equipment will I Need for this Recipe?
The only equipment that is absolutely necessary is a pan or container to put the banana pudding in and something to whisk or stir and a pot to cook in. However, there are certain items that will make life a little easier and speed up the making of the desert and I'll go through what I use below.
Pan Size & Style
I used an 8x8 glass dish that is oven-proof in this recipe and the ingredients fit perfectly. You can use a round dish, a square dish, or a rectangular dish, it makes no difference. Just make sure if fits into the appliance you are using to bake in if you plan on making the meringue topping.
You can make banana pudding with meringue topping in any size pan as long as it's oven-proof. If you skip the meringue topping, then any container will work just fine. Some people like to layer in a glass bowl or, if you are making it for a family gathering of more than 6 people, I would make it in a half pan (10x12 or 9x13) and double the ingredients.
The important thing in this recipe is to adjust the amounts of pudding, cookies, bananas, and meringue so you have enough for the layers. How many layers you do is completely up to you, but I do 3 layers of cookies, 3 layers of bananas, 2 layers of pudding and top with the meringue.
Mixer
I use my Kitchenaid stand mixer with the whisk attachment for this recipe and it works great. The stand mixer will whip the cream and the egg whites for the meringue in minutes. However you can also use a hand held mixer and you can achieve the same results, it might just take a little longer.
If you don't have a mixer or a hand mixer, you can absolutely use a whisk and whip the cream and egg whites manually. I find that whipping the cream isn't that difficult, but personally I would skip the meringue topping if I didn't have a hand held or stand mixer because I don't have the patience to whip egg whites by hand.
Cooking Surface & Pot
I used my (affiliate link)Ninja Foodi Pressure Cooker & Air Crisper to make this recipe because it acts like a big pot on the stove and I find I can control the heat perfectly. However, it is absolutely not necessary. The stove works fine.
Just keep in mind that temperatures are important in this recipe, because if your heat is too high, you can burn the pudding and, if it's too low, it won't thicken after adding the cornstarch slurry.
If you are using the Ninja Foodi with the ceramic pot, use my temps and you should be fine. If you are using a stainless steel pot in the Foodi or in your Instant Pot, you will want to take the heat down one notch to medium high for steaming the milk and then low to medium low after you add the cornstarch slurry.
It doesn't make much difference what kind of heating element you have; electric, gas, or induction work just fine. The thing to remember is once gas is turned off, it's off. The same with induction. However, with electric stoves, the heat is still transferred for several minutes while the electric burner cools down. So, if you are finding that your temperatures are too high and you are worried about burning the pudding, remove the pot from the electric burner for a minute or two while you turn the heat down.
The type of pot you choose is more important than what kind of heating surface you use because different pots will conduct heat differently. Just like when making homemade candy, you don't want to use a thin bottom aluminum pot because it conducts heat too quickly and unevenly, often causing hot spots. This is a common problem I've heard from people making my homemade toffee and it's completely avoidable when you use a heavy bottom pot that conducts heat evenly.
You can also use a large saucepan if you don't have a pot, just make sure it will hold at least 2 cups.
Baking Appliance
You can use any type of appliance that can apply heat to the top of the pudding. I used the oven to bake the meringue, but even a blow torch would work. You can use the broil function or bake. It doesn't really matter as long as you can get heat to the top to bake it. I know people love to use different appliances in their kitchen, so here are my suggestions for various different baking appliances.
Standard Oven: Bake 375F for 7-10 minutes or broil, but watch it closely.
Ninja Foodi Pressure Cooker & Air Crisper: Preheat on broil for 10 minutes, then put the banana pudding with meringue in the foodi on the rack in the low position. Broil for 6-10 minutes or until the meringue is golden brown on the peaks.
Ninja Foodi Indoor Grill: Preheat on broil for 10 minutes. Place the container with the banana pudding in the grill and broil for 5-7 minutes or until the meringue is golden brown on the peaks.
Ninja Foodi XL Oven: Preheat on broil and put the rack in the #2 position and broil the top for 5-10 minutes or until the peaks are golden brown.
Ninja Foodi Flip Oven: Preheat on broil and broil for 5-7 minutes or until the peaks are golden brown.
Convection Oven: If you can turn the convection off, I would do that so you don't blow around the egg whites. If you don't have that option, then place the container of pudding further away from the fan, if you can, and broil for 5-10 minutes.
Kitchen Torch: You can absolutely use a kitchen torch to toast and bake the meringue. The important thing to remember is to keep the torch far enough away and make even passes over the top until the egg whites are set and the peaks are golden brown.
How to make Old Fashioned Banana Pudding
I consider this old fashioned because everything is homemade except for the cookies and I think we often grab the box of pudding and container of Cool Whip to save time and have gotten away from making things the old fashioned way, homemade. If you choose to make the dessert as I did, I think you will be surprised that it really doesn't take that much longer and I'm going to walk you through each step.
The easiest way to break up the recipe is into three steps; making the custard, layering the pudding, and baking the meringue. Each step below will have detailed instructions with pictures and I also have a step by step video that you can watch.
Making the Homemade Custard
Prep
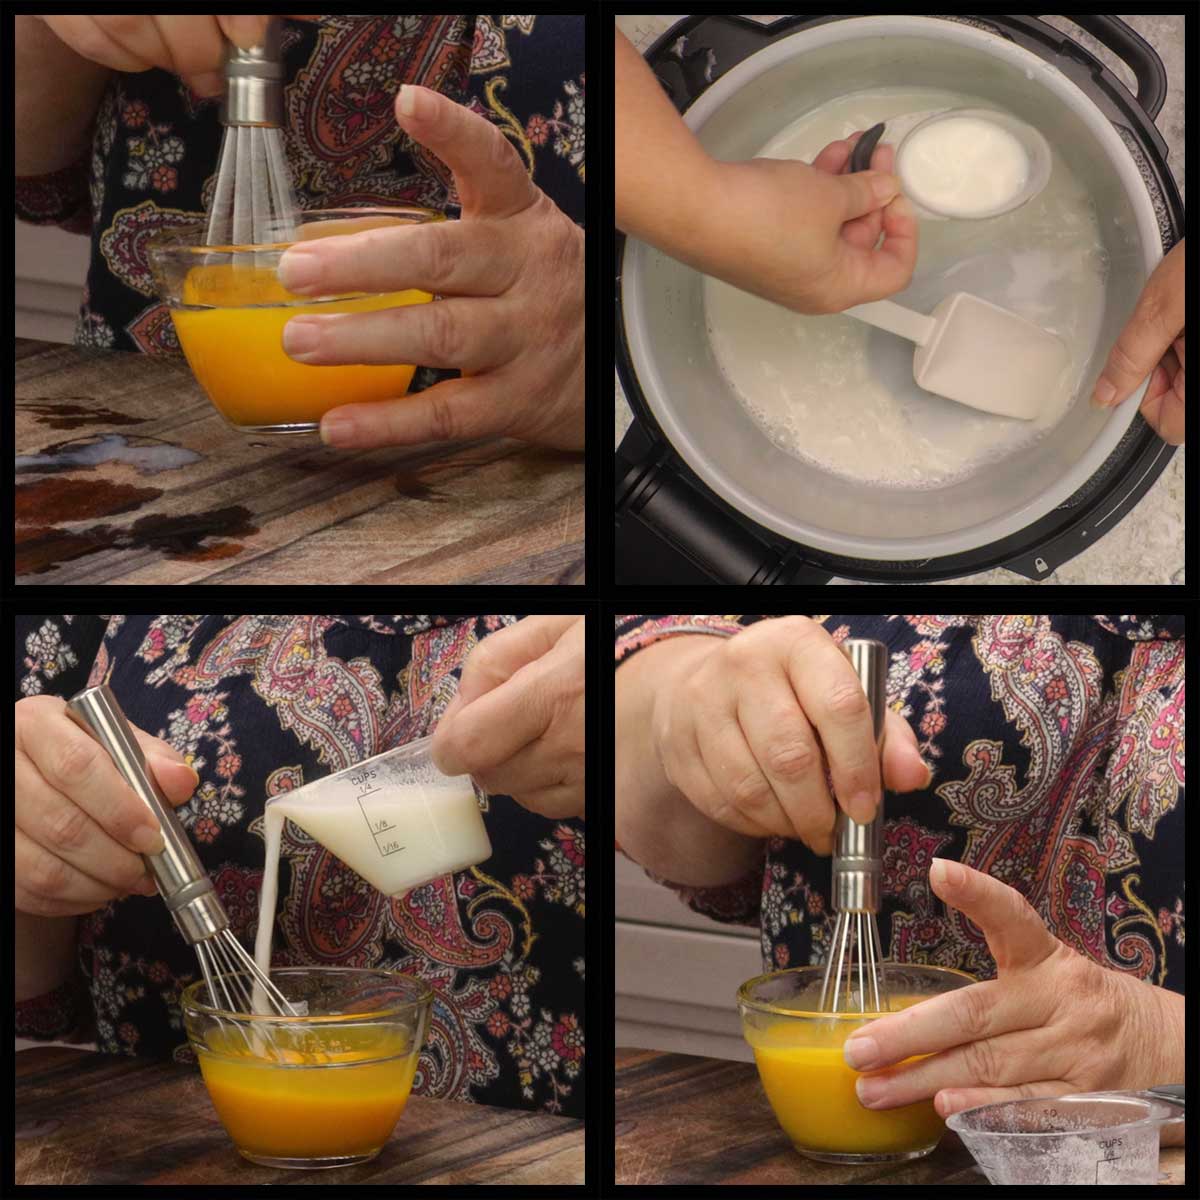
Measure out the ingredients for the pudding and have them ready to go. This goes fast once you start cooking, so you need to have everything ready.
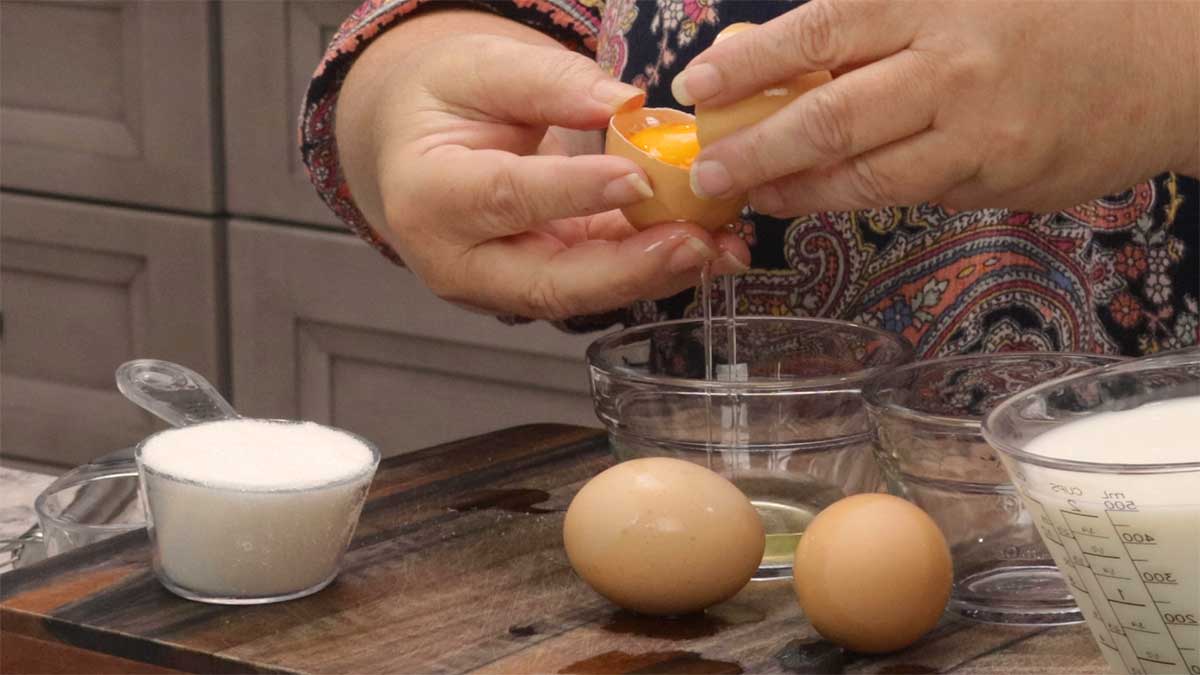
Eggs: Separate the whole eggs by placing the whites and yolks into separate bowls. The yolks are used in the pudding, but set the whites aside for later if you are making the meringue topping. It's best that the egg whites are room temperature for whipping later.
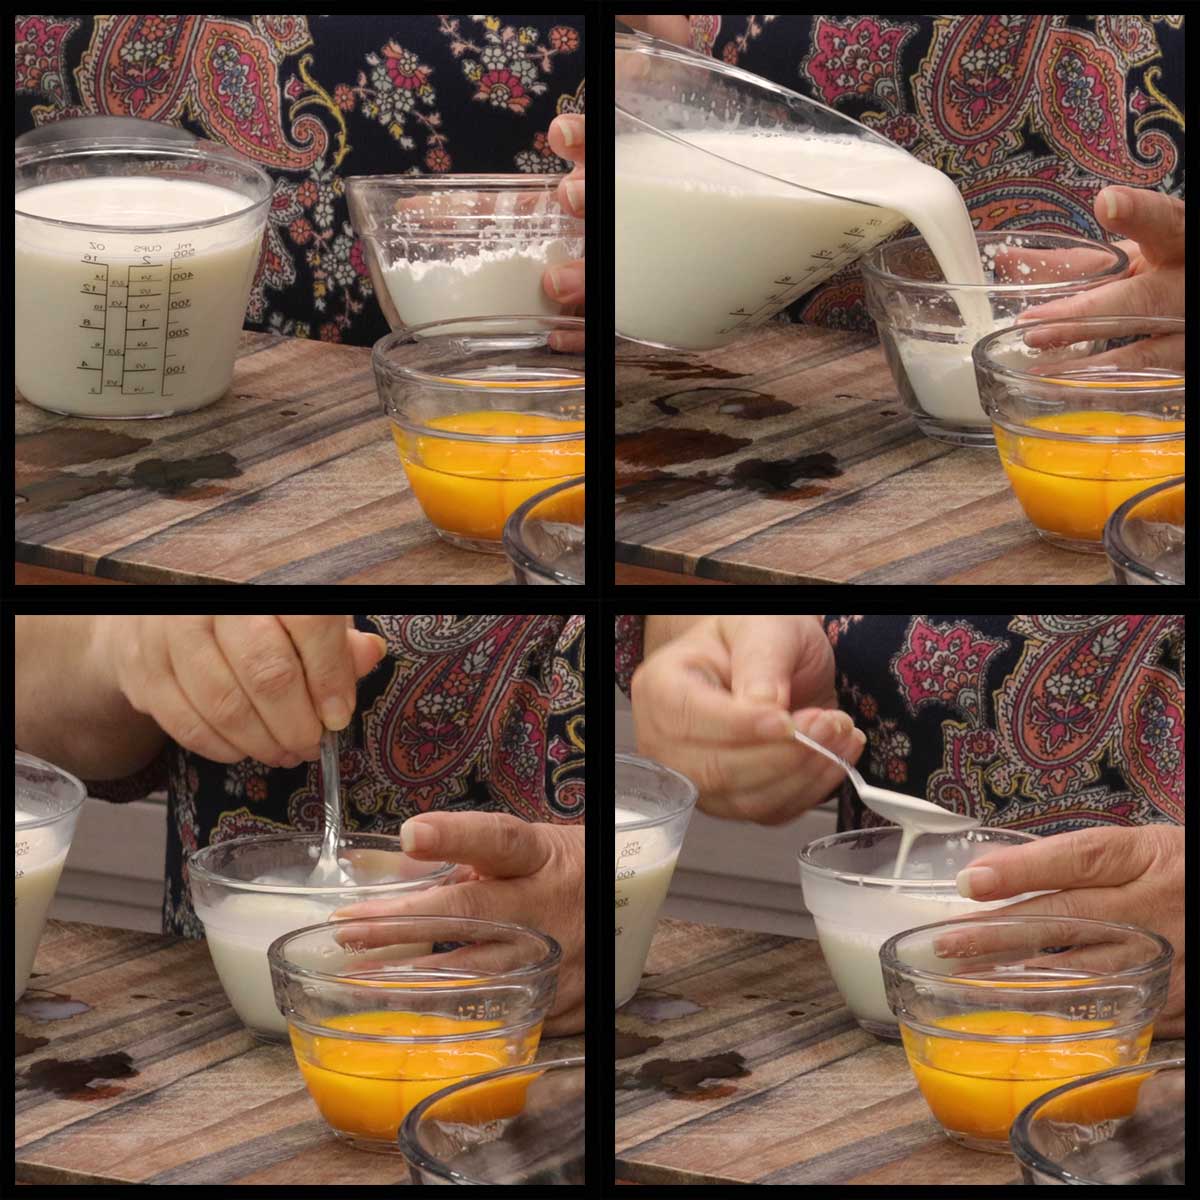
Cornstarch Slurry: Combine ¼ cup of the cold milk with 3 Tablespoons of cornstarch in a small bowl or measuring cup and whisk to combine. The mixture should be thin and free of lumps.
Heating the Milk
Add the remaining milk and ½ cup sugar and salt to the inner pot of the Ninja Foodi or a pot on the stove. Heat over high heat and stir to incorporate the sugar. If you are using a stainless steel pot, you may want to use medium heat or medium-high. The goal is to melt the sugar and heat the milk until it is steaming, but not boiling. Once the milk starts to steam, turn the heat down to low-medium. You want to keep the milk hot, but not so hot that it will burn to the bottom on the pot.

Tempering the Eggs
Using some kind of scoop or measuring cup, remove about ¼ cup of the hot milk mixture and slowly pour it into the bowl with the egg yolks while whisking constantly. The idea is to bring the temperature of the egg yolks closer to the temperature of the milk so when we add the egg yolks to the hot milk they don't immediately cook. I recommend pouring just a small amount of the milk into the egg yolks at first. If you see the eggs start to firm up like they are cooking, then your milk is too hot and you need to let it cool down a little. You can strain out the clumps of cooked egg as long as it's not too much and just keep going.
Thickening
Keep the heat on low-medium. Once the egg yolks are tempered, you want to pour just a small amount of the egg mixture into the pot of milk while you are whisking the milk. It is very important to keep the milk moving and a whisk does the best job at introducing air to the milk to keep it cool enough not to cook the eggs. If you notice that the egg yolks are clumping, that means the milk is too hot and you need to turn down the heat. You can strain any clumps, wait for the milk to cool down and then resume adding the eggs.
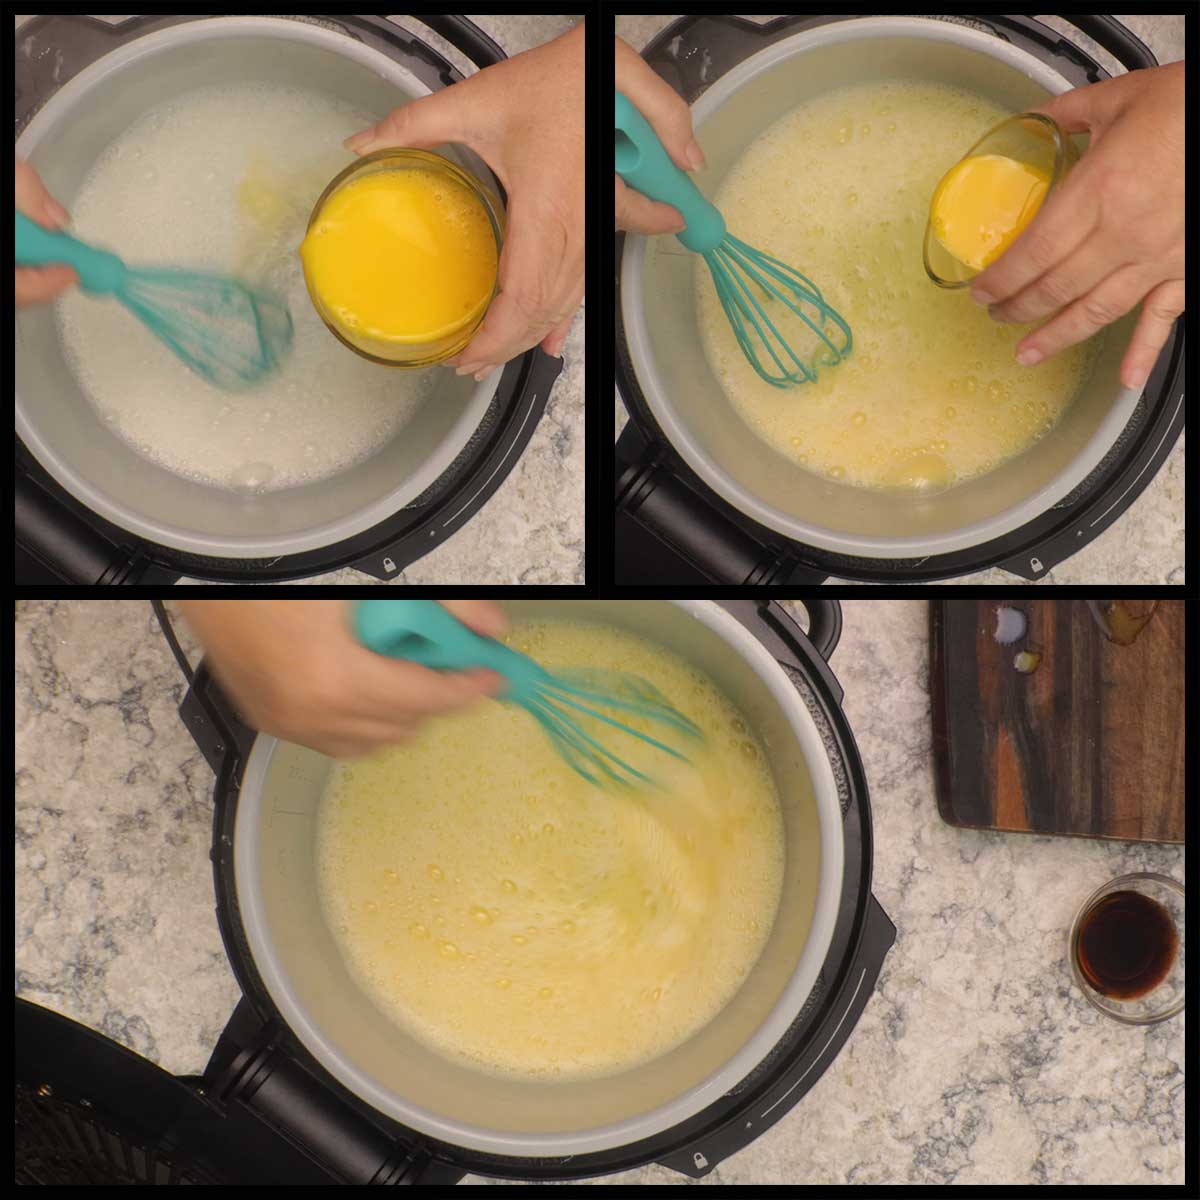
The most important thing while thickening the pudding is constant whisking or stirring and managing the heat. Once the egg yolks are incorporated, it's time to add in the cornstarch slurry. Since it's been sitting, you will want to stir it in case the corn starch settled. Add in the slurry, while whisking or stirring the custard.
Stir or whisk constantly over low medium heat until you see the mixture start to thicken. Once it starts to thicken, turn the heat off and continue stirring until it is a thick pudding/custard consistency. Remove the pot from the heat source.

Whisk or stir in the vanilla extract. Transfer the custard to container (I used a 4 cup glass measuring bowl) and cover with cling wrap. It's important that you push the plastic wrap down so it touches the surface of the custard or it will develop a skin on top that won't be pleasant in your banana pudding.
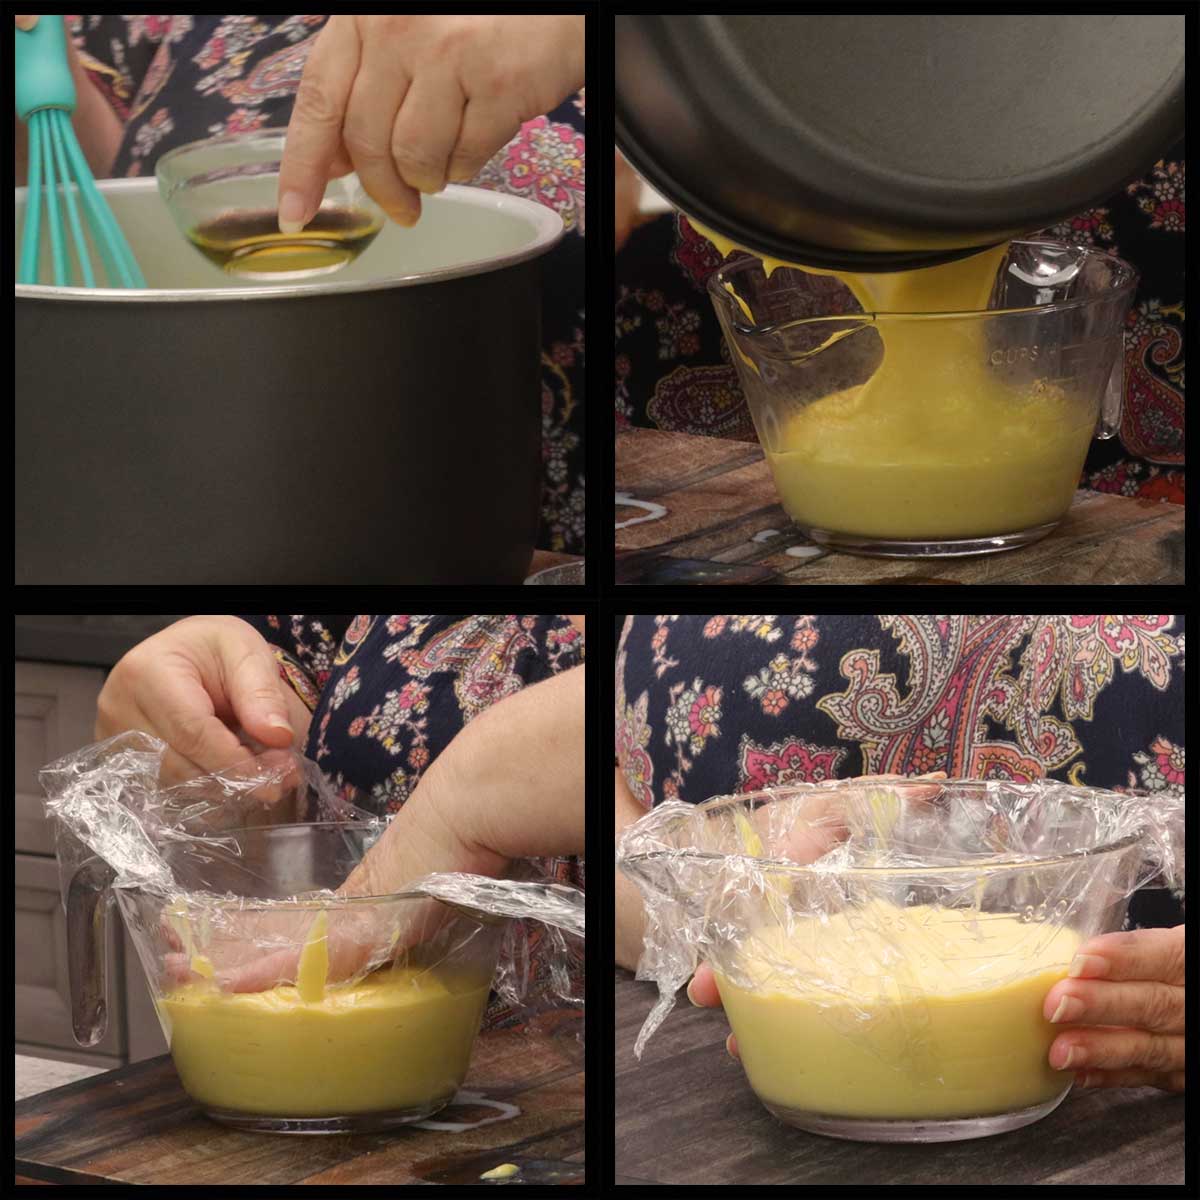
Put the bowl of custard in the refrigerator for 2-4 hours so it can cool down.
Congratulations! You just made a rich vanilla egg custard!
While the custard is chilling, it's time to make the whipped cream.
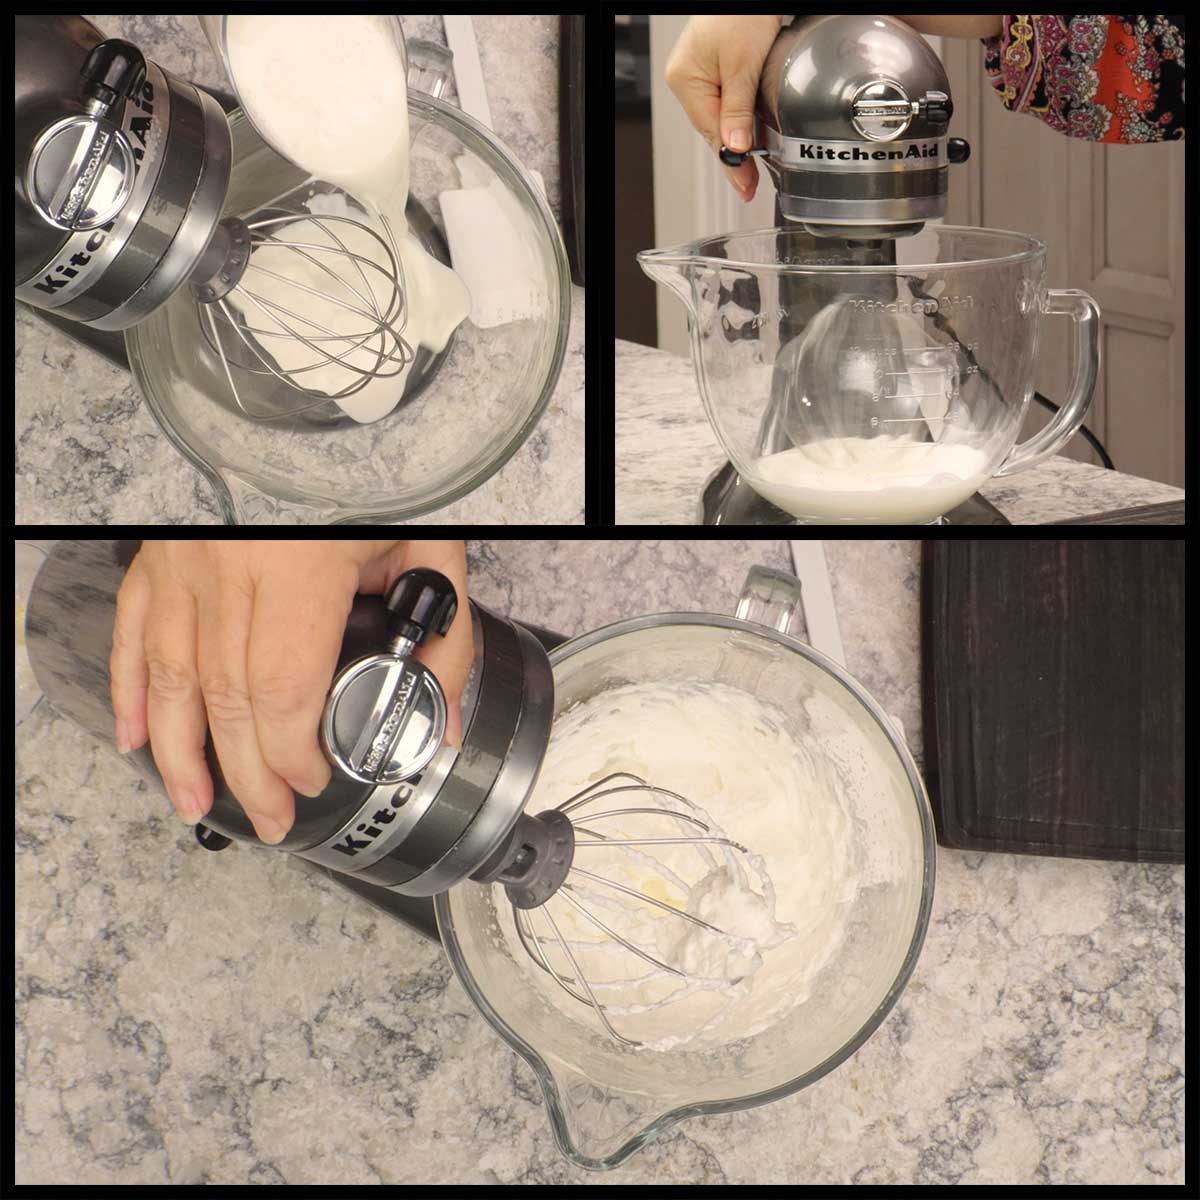
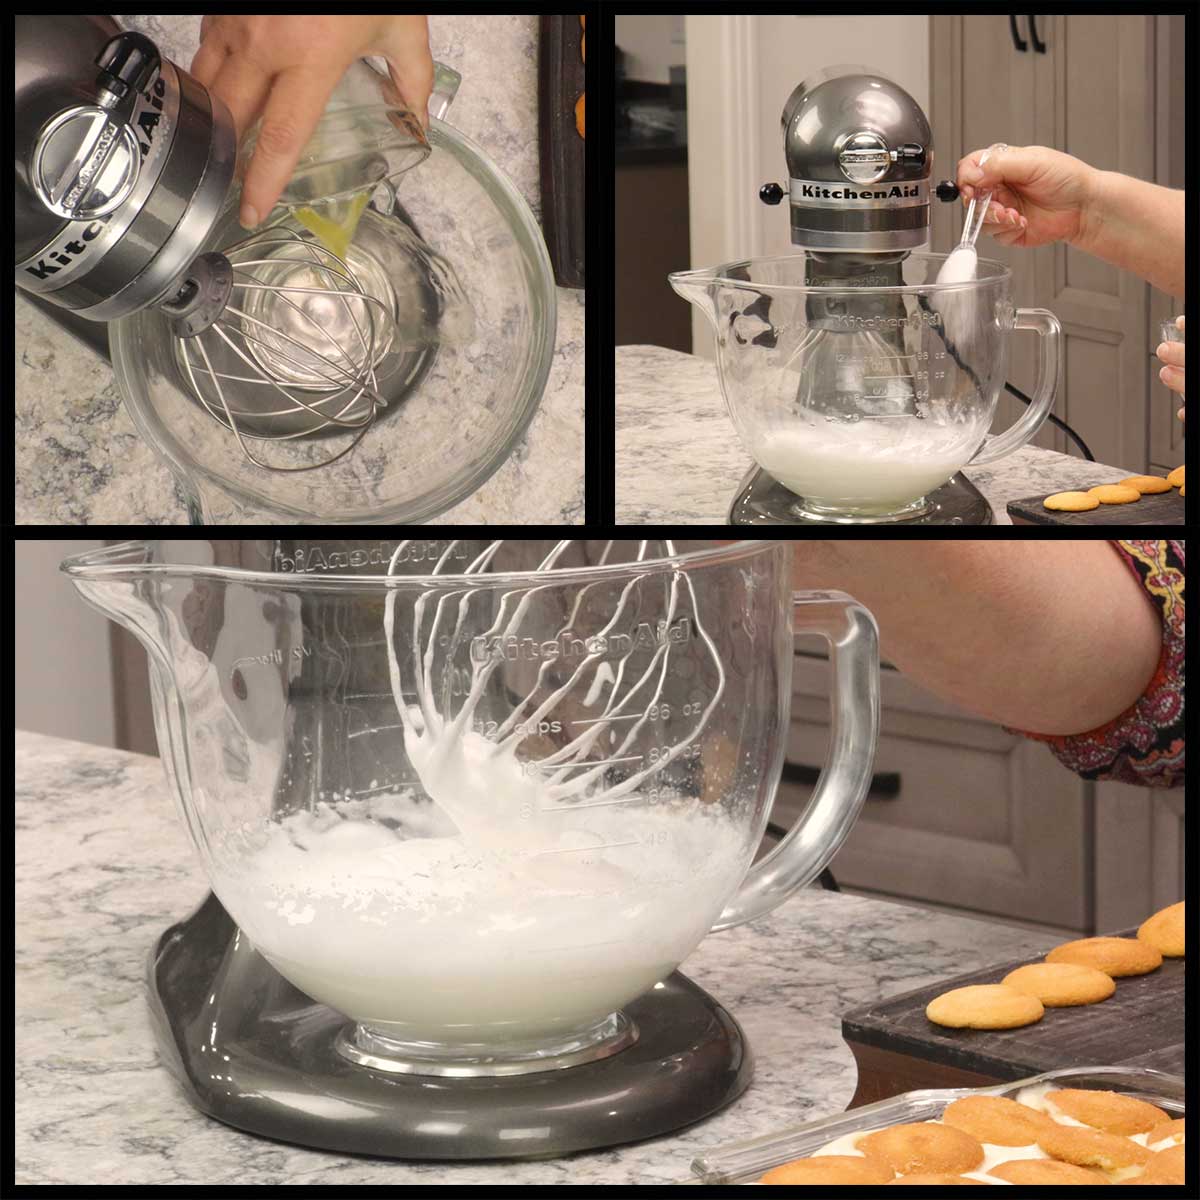
Whipped Cream
Add the heavy cream to the bowl of a stand mixer or medium bowl if using a stand mixer. Use the whisk attachment and start off at medium speed. Once you see the cream start to thicken, move up to high speed until the cream has thickened and soft peaks form. Cover and refrigerate until you are ready to use.
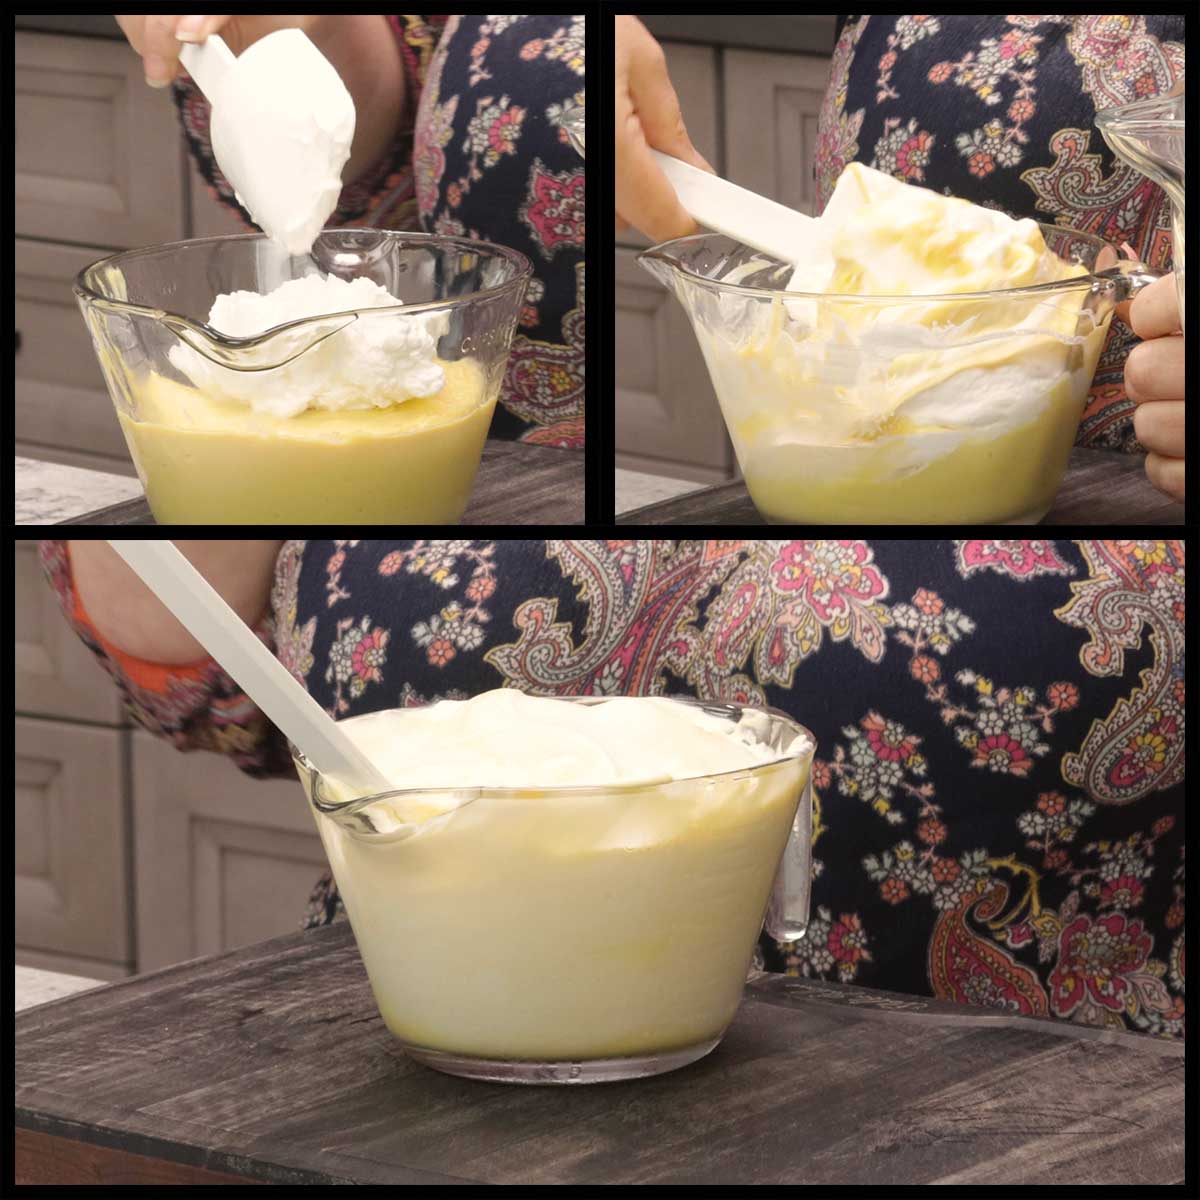
Folding the Cream into the Custard
This step is completely optional and most banana pudding recipes don't do this, but I found that it lightened up the custard and the texture in the banana pudding and is dream-like!
When the custard has chilled, it's time to fold the whipped cream into it and make this light and fluffy vanilla pudding.
Add about 1 cup of the whipped cream and gently fold it into the custard until you barely see any of the white of the cream. Repeat until all of the whipped cream is used.
Now it's time to make the meringue topping and assemble the banana pudding!
Making the Meringue Topping
The most important thing when whipping egg whites to make meringue is to make sure your bowl and utensils are clean and dry. If there are any traces of fat, your egg whites won't whip up.
Some people add a little bit of cream of tartar to the egg whites to stabilize them, but I have never found this necessary.
Place the room temperature egg whites into a clean bowl. I like to use my stand mixer, but a hand held high speed electric mixer will work as well.
Whip the egg whites on high speed until they form soft peaks. Don't over whip or the egg whites will form stiff peaks and that makes it hard to spread over the top of the banana pudding.
Assembling the Banana Pudding
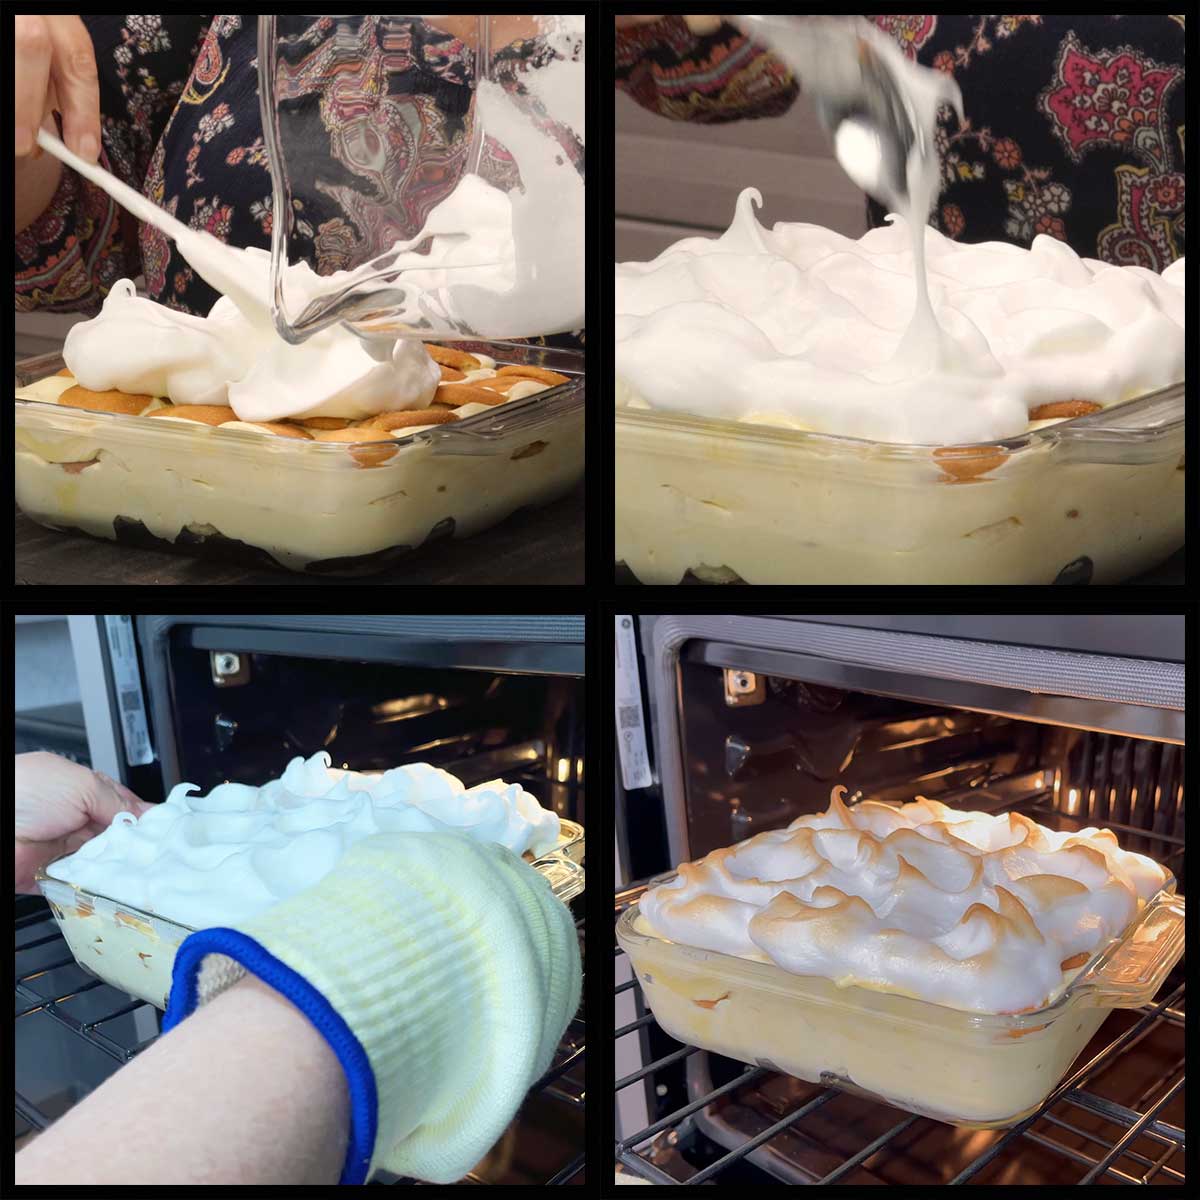
If you are making the meringue topping, it's time to preheat the oven on 375℉/190℃ or on broil if that is the function you are using.
How you choose to layer your banana pudding is completely up to you. Some people start with the pudding on the bottom and do three layers of pudding, but I start out with the cookies and only do two layers of pudding. I love the way it turns out using this layering technique, but there isn't any right or wrong to layering.
Put a layer of the vanilla wafers on the bottom of the dish you are using for your banana pudding. Then add a layer of banana slices.
I slice the bananas just before assembling and usually make them about ½" thick. You can toss the banana slices in lemon juice to help prevent browning, but I didn't and they didn't turn brown.
Spread half of the vanilla pudding (custard) on top of the banana slices, making sure the bananas are completely covered.
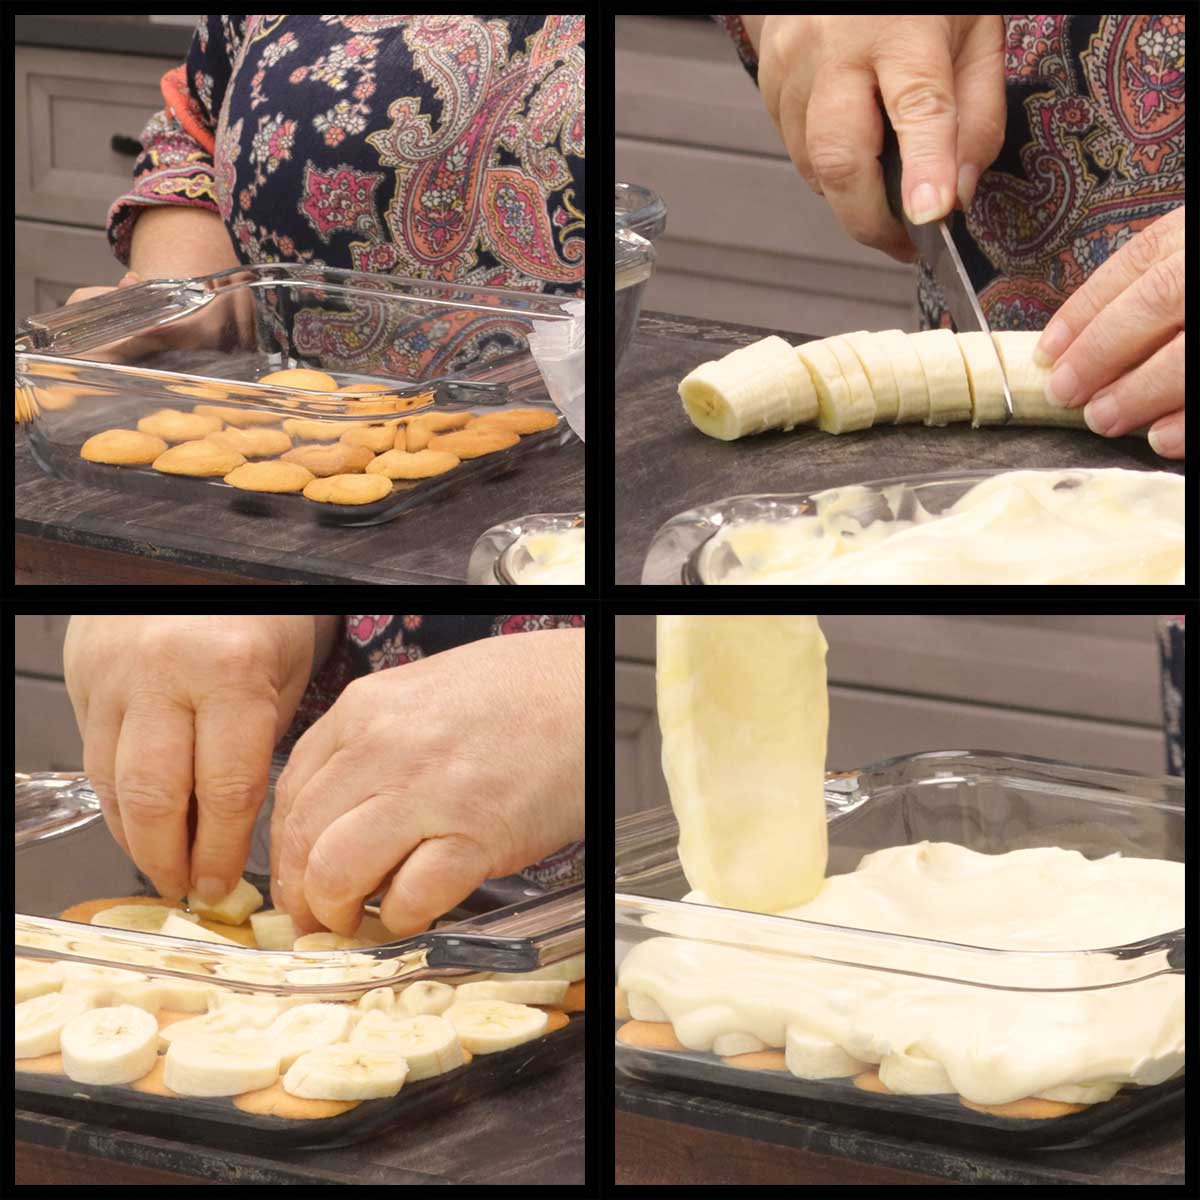
Repeat with another layer of vanilla wafers, layer of bananas, and the remaining pudding.
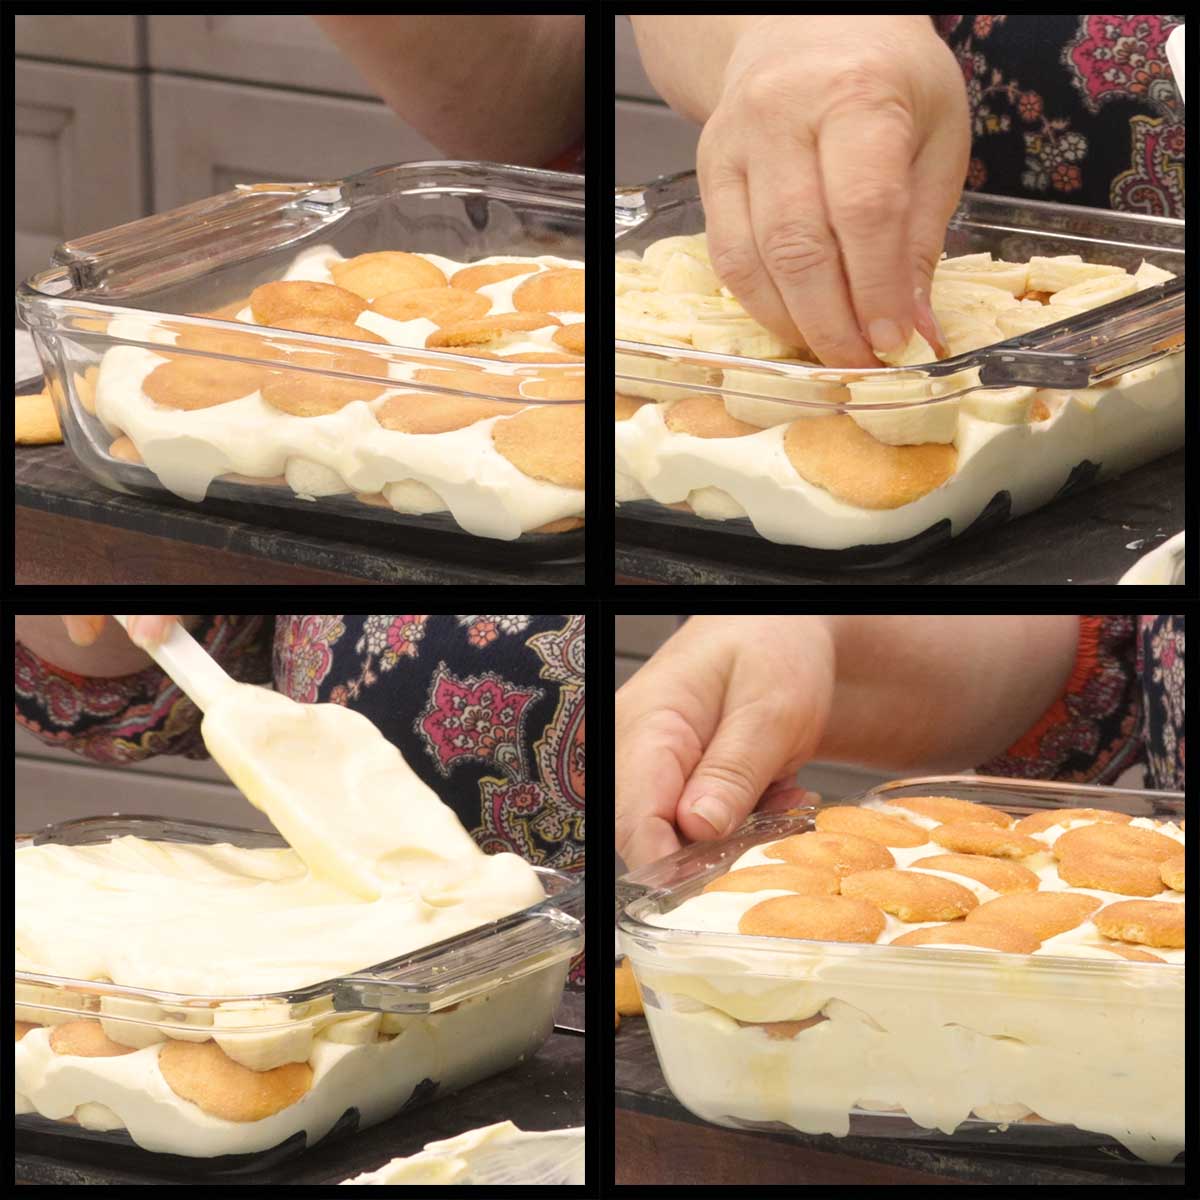
Then I top with a third layer of cookies, followed by the meringue topping. If you are skipping the meringue topping, you will want to top with whipped cream and make sure it covers the entire top to prevent any exposed banana slices from browning.
Swirling & Baking the Meringue
Once you put the whipped egg whites on top of the banana pudding, gently spread it out so it covers the entire top, especially the bananas. It's important that you don't deflate the egg whites, so being gentle is important.
Using the back of a spoon or another utensil, make peaks and valleys with the egg whites. This is solely for decoration, so don't worry too much about it.
Place the pan of banana pudding into the preheated oven and bake (or broil) until the egg whites are set and the peaks are golden brown. Do not worry if you bake it longer and the entire surface is golden brown, it's fine! My mom actually thinks it looks better and tastes better that way.
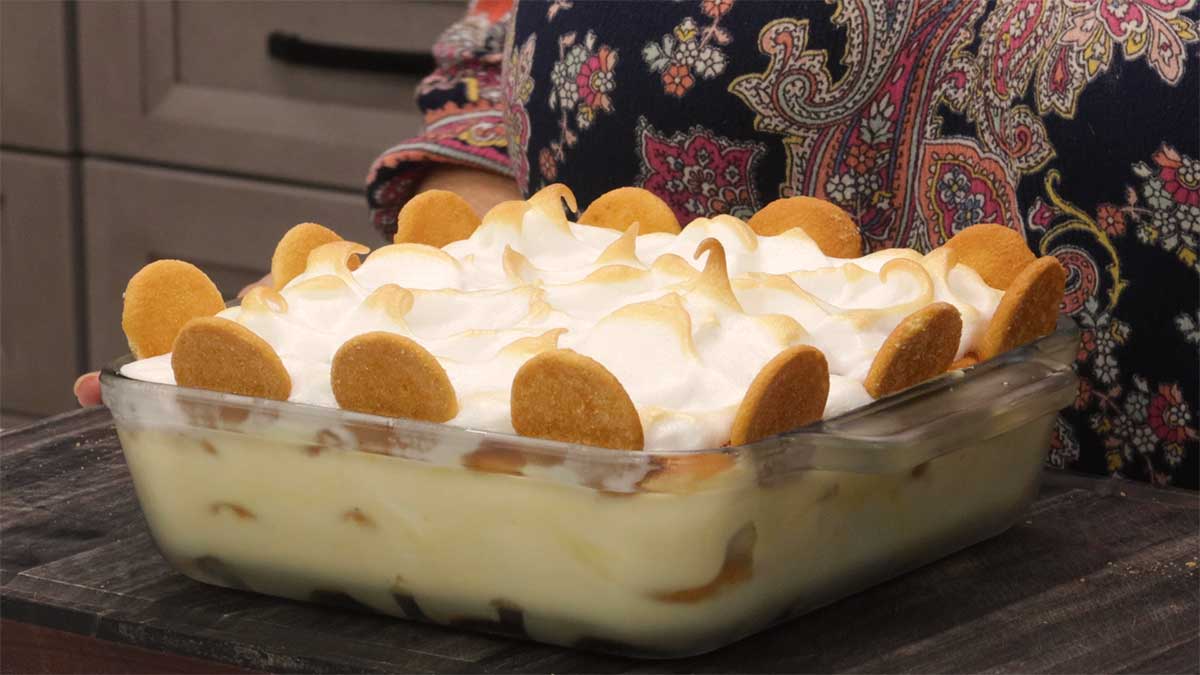
Once the meringue topping is done, I like to refrigerate the banana pudding overnight. I find this allows the flavors of the bananas to infuse into the pudding and it's absolutely delicious! You can cover with foil, but make sure it is tented and won't touch the meringue.
The final touch before serving is to decorate with more vanilla wafers. Of course this is optional, but I love the crunch of the cookies with the soft texture of the banana pudding. Make sure you do this just before serving so the cookies to soften up in the fridge.
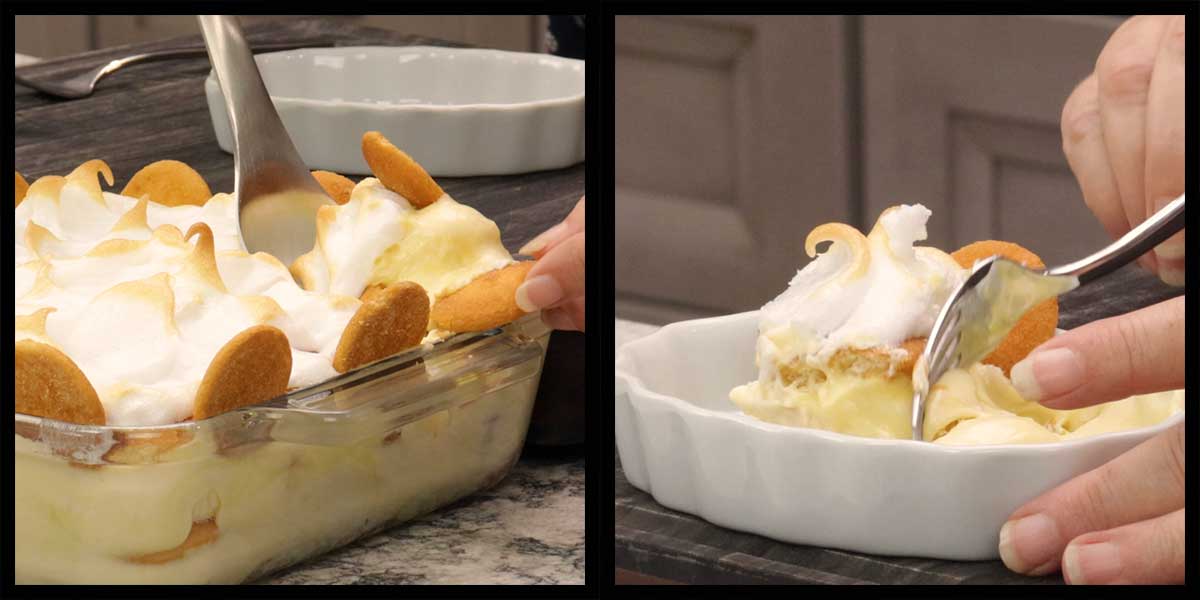
Serve & Enjoy!

Banana Pudding with Meringue Topping Recipe
Ingredients
Homemade Vanilla Pudding
- 3 large egg yolks
- 2 cups whole milk
- 3 Tablespoons cornstarch
- ½ cup white sugar
- ¼ teaspoon fine grind sea salt
- 1 Tablespoon vanilla extract
Whipped Cream
- 1 cup Heavy Whipping Cream
Meringue Topping
- 3 large egg whites
- 2 Tablespoons white sugar
For Assembling the Banana Pudding
- 11 ounces vanilla wafers
- 3-4 bananas
Would you like to save this recipe?
Instructions
Prep
- Separate the egg yolks from the egg whites and put them into separate bowls. You will use the egg yolks in the pudding and the egg whites in the meringue. Keep them at room temp.
- Measure out all of your ingredients for the pudding.
- Mix ¼ cup of the whole milk with the cornstarch to make a cornstarch slurry. Set aside.
Homemade Vanilla Custard/Pudding
- Add the remaining milk to the inner pot of the Ninja Foodi or Instant Pot or to a pot on the stove. Add in the sugar and salt. Stir to combine and heat over high to medium high heat until the milk begins to steam. You do not want to boil the milk. Stir occasionally to prevent scorching.
- While the milk is heating, lightly beat the egg yolks and make sure the bowl is big enough to whisk in ¼ cup of the hot milk.
- Once the milk is steaming, reduce the heat to low-medium to prevent scorching. Remove ¼ of the hot milk mixture and slowly stream it into the egg yolks while whisking constantly. This will temper the egg yolks which helps to prevent them from cooking when they are added to the hot milk.
- Slowly stream in the tempered egg yolks into the hot milk, whisking the milk the entire time. Whisking is better than stirring because it brings more air into the milk and cools it down so the eggs don't cook. Once all of the egg yolks are incorporated, add in the cornstarch slurry. You may want to stir the slurry to make sure it didn't settle while sitting.
- Continue whisking constantly until the pudding starts to thicken. The cornstarch needs heat to activate, but you don't want the pudding to be too hot or it will burn. Adjust your heat accordingly. As soon as the pudding starts to thicken, turn the heat off and continue to whisk while it thickens up more.
- Remove from the heat and whisk in the vanilla extract. Transfer to a glass bowl and cover with cling wrap. Make sure to have the cling wrap touching the top of the custard so it doesn't form a skin. Refrigerate for about 2 hours.
- Place the heavy whipping cream into a bowl of a stand mixer or a glass/metal bowl if using a hand mixer. Begin whisking on medium speed until the cream starts to thicken and then whisk on high speed until you see peaks forming in the cream.
- When the custard has cooled, fold in the whipped cream. Remove the cling wrap, and stir the pudding. If you see steam, it is not cool enough and should be returned the to fridge. Add about 1 cup of the heavy cream on top of the custard and gently fold the cream into the custard until you barely see any white from the whipped cream. Repeat until all of the whipped cream is used.
- Cover and refrigerate if you aren't using right away.
Meringue Topping
- Make sure your mixing bowl is clean and dry. Any traces of fat will prevent the egg whites from whipping up.
- Add the egg whites to the bowl of a stand mixer or a medium bowl if using a hand mixer. Whisk on high speed until they start to thicken. Add in ½ Tablespoon of sugar at a time and whisk on high until incorporated. Repeat for the remaining 1½ Tablespoons.
- The meringue is done when soft peaks form. Some people like to see stiff peaks, but I found it is very easy to over whip the egg whites and that makes it harder to spread on the top of the pudding without deflating the meringue.
Assembling the Banana Pudding
- Preheat the oven on 375°F/190°C
- While it doesn't really matter if you use a casserole dish or a bowl for your banana pudding, you will want something that is around an 8"x8" with at least a 3" depth. Anything larger and you will need to increase the ingredients. For a 9x13 pan, double all of the ingredients.
- Place a layer of cookies on the bottom of your pan. Add banana slices that are about ½" thick. Cover with half of the pudding mixture and spread it out so it covers all of the bananas. Repeat with a second layer of cookies, banana slices, and the remaining pudding.
- Top with a layer of cookies and then gently spread the meringue over the top. Use the back of a spoon to make the peaks in the meringue.
- Place the dish in the oven so that it is near the top, but the meringue is not too close to the heating element. Bake for 7-10 minutes or until the peaks turn golden brown.
- Remove from the oven and chill for at least 4 hours, but overnight is even better!
- Decorate with more cookies on top just before serving. Serve & Enjoy!
Nutrition
About the Recipe Author, Louise Long
Louise is a full-time recipe creator and food blogger @ The Salted Pepper. She has over 30 years of experience with cooking and recipe development. She owned a restaurant for several years and was a full-time RN until retiring to blog full-time.

She published her first cookbook in the Fall of 2018 and is very interested in writing several more.
Louise is also the creator of an online Ninja Foodi Pressure Cooking Course with over 100 instructional step-by-step videos. People absolutely rave about the course and all the value they have received from it.
Louise has several very active Facebook groups that help people with the basics of cooking and learning more about the appliances they love.
Ninja Foodi Pressure Cooker & Air Crisper 101
Ninja Woodfire Outdoor Grill & Smoker
Louise is also a YouTube creator and you can find most of her recipes in video format on The Salted Pepper YouTube channel.
She is very responsive to messages and eager to help in any way she can. Get more Information about Louise & contact information
I WOULD LOVE TO SEE WHAT YOU ARE COOKING UP IN YOUR KITCHEN! TAG ME @THESALTEDPEPPER ON YOUR FAVORITE SOCIAL MEDIA PLATFORM WHEN YOU MAKE A DISH!
BE SURE TO FOLLOW THE SALTED PEPPER RIGHT HERE ⇓⇓⇓⇓⇓
Amber says
This is hands down, the very best banana pudding I have ever made and eaten! I love, love, love this recipe. It was very easy to make and so beautiful when it was finished. Perfect custard consistency with no scrambled eggs! The recipe is perfectly written so anyone can be successful. Everyone who tried it agreed with me that is was by far the BEST banana pudding they have ever eaten. I will be making this over and over again. Thank you for another perfect recipe! 🥰
Louise says
I'm thrilled you liked it! I think it's the best I've ever had as well!
Lynnette says
Thank you so much for sending me the recipe again! Now I need to get to my kitchen and make this wonderful dessert; before all my bananas are gone!
JP Banks says
Louise I love your recipes. But, this one seems a little work intensive for me. As I was reading thru the instructions I stumbled at the 2 hr in the refrig. I make my banana pudding using the box method and it taste pretty good to me. I think I'll pass on this on, no reflection on you it's on me and my laziness. keep the recipes coming. I lovem.
Louise says
Thank you! I do have to say that you might be surprised at how easy it is to make your own pudding and hopefully one day you might give it a try! Even when you make the banana pudding from a box, I think it still has to be in the fridge to set up. This isn't much different. I am so glad you are enjoying the recipes though!
Cathy Homan says
Can I use sugar alternatives for all the sugar including for the meringue?
Sharon Zimberoff says
Louise, this looks delicious. 😋 I follow the Keto way of eating. Like almost all of your recipes, I could definitely "ketofie this." Not sure if that's a word, but you know what I mean. I have adapted many of your wonderful recipes to my Keto way of eating.
Louise says
I'm so glad you are able to modify the recipes to fit your eating style!