

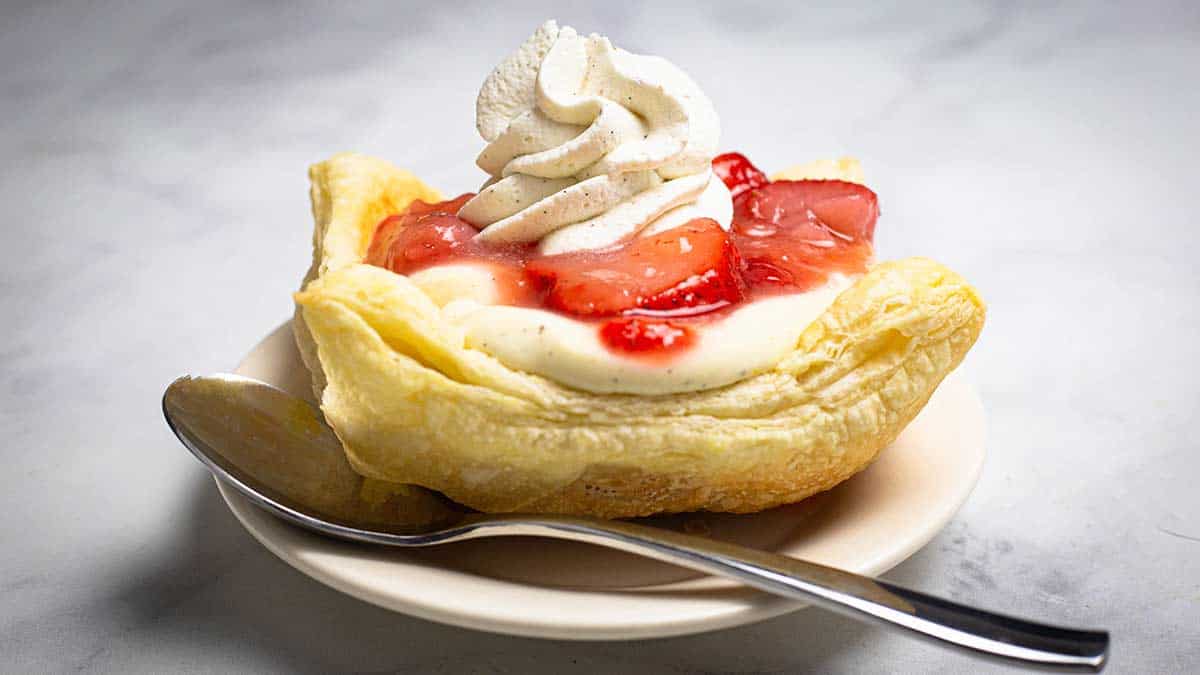
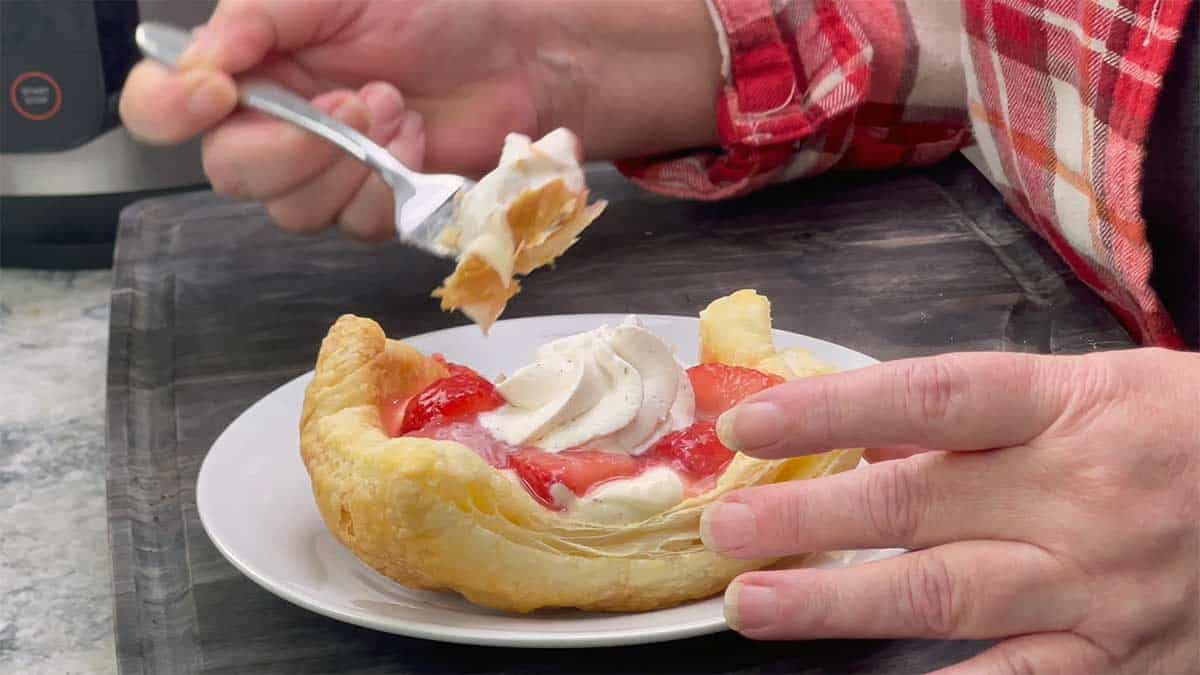
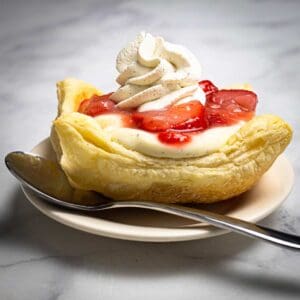
Imagine a dessert that consists of puff pastry filled with vanilla pastry cream, topped with glazed strawberries, and a dollop of Chantilly cream. Doesn't that sound perfect?
It's also exactly what this dessert is, and it's super easy to make!
Would you like to save this recipe?
I had a super hard time naming this recipe because there really isn't a name for it. I did see recipes that are similar and they called them strawberry tarts, but technically this isn't a tart so that was out.
I reached out to my Facebook followers and asked them for some ideas. There were some great names, but the one that I liked the most was Strawberry Chantilly Puffs, which Beth P. suggested.
It conveys the right message for this dessert, and once you make it, you will see why. It's obviously a strawberry dessert, so having strawberry in the name is important (although it would be good with many different kinds of fruit).
But, that isn't why this suggestion stood out more than the other great names. When I hear the word Chantilly lace, I immediately think of a beautiful, intricate lace design that looks airy and even fragile but is actually very durable. THAT describes this dessert! It's light and airy while still being sturdy, substantial, and a bit indulgent.
So, I welcome you into the world of Strawberry Chantilly Puffs, and I know you will fall in love just like I did!
Suggested Kitchen Tools for Strawberry Chantilly Puffs
- 6- or 12-well muffin tin (I like to use the (affiliate link)Jumbo size)
- Small saucepan
- Plastic wrap
- Stand or hand-held electric mixer
- Pastry bags and open star tip (optional)
Ingredients & Substitutions
This dessert is made up of four different recipes; puff pastry bowls, glazed strawberries, vanilla pastry cream, and Chantilly cream.
Puff Pastry Bowls
The base of the dessert is puff pastry and there are many different ways you can make the cups. You can even buy puff pastry shells and simply bake them according to the package instructions.
Making your own puff pastry is an experience that I recommend everyone try at least once; but don't worry, we aren't going down that road with this recipe. This is an EASY and QUICK recipe!
What I recommend for the dessert base is grabbing a box of puff pastry sheets or puff pastry shells.
Another option for the base of this dessert would be pie crust or a tart crust. You would want to have your pie crust blind baked or you can buy a premade one that is already cooked and simply fill it with the pastry cream and strawberries.
Individual tart shells that are premade are another way to simplify this dessert.
You can also skip the pastry and fill little ramekins with the pastry cream and top with strawberries and chantilly cream.
Pastry Cream
Pastry Cream is a form of custard that is cooked on the stove. It is usually thicker than custard and is able to be piped, and it holds its shape. In this recipe, I like a softer and lighter cream, so I combine a thicker pastry cream with the Chantilly cream (sweetened whipped cream), which makes what is called diplomat cream.
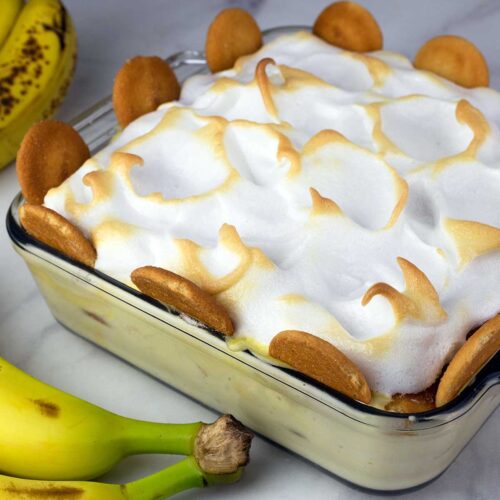
I do the same thing in my banana pudding recipe, which is so delicious!
If you want a shortcut, you can use prepared vanilla pudding instead of the pastry cream.
Glazed Strawberries
Making glazed strawberries for this recipe adds a nice shine and thickness to the strawberry sauce and looks absolutely beautiful.
However, you can simply use some sliced strawberries and add a little sugar to create a thin syrup-like juice.
Personally, I think it is worth the extra step to make the glaze, and it's super easy to do!
You could also use strawberry preserves as your topping or a strawberry pie filling, but those will be much sweeter.
Chantilly Cream
Don't let the fancy name confuse you; Chantilly cream is simply sweetened whipped cream flavored with vanilla.
It's simple to make at home using a stand or hand-held electric mixer.
You can also use ready-made Cool Whip or Reddi Whip in a can if you want a shortcut.
How to Make Strawberry Chantilly Puffs
Mise En Place (prep for recipe)
This dessert is made of four different recipes if you want to make it from scratch. You can also use the shortcuts outlined in the above Ingredients and Substitutions section if you don't have time to make everything from scratch.
Nothing beats homemade, though; so I hope you make it from scratch!
The idea for this recipe is that the components can be made ahead of time, and then the dessert is assembled quickly just before serving.
You can assemble the dessert ahead of time, but I wouldn't do it much more than 30-60 minutes before serving.
Making the Pastry Cream
I recommend making the pastry cream 1-2 days before you plan to serve the dessert to allow it enough time to chill, but it can be made 4-6 hours before serving if you want to do it all in one day.
It takes less than 5 minutes to make the pastry cream; you only need a spatula or wooden spoon and a small saucepan.
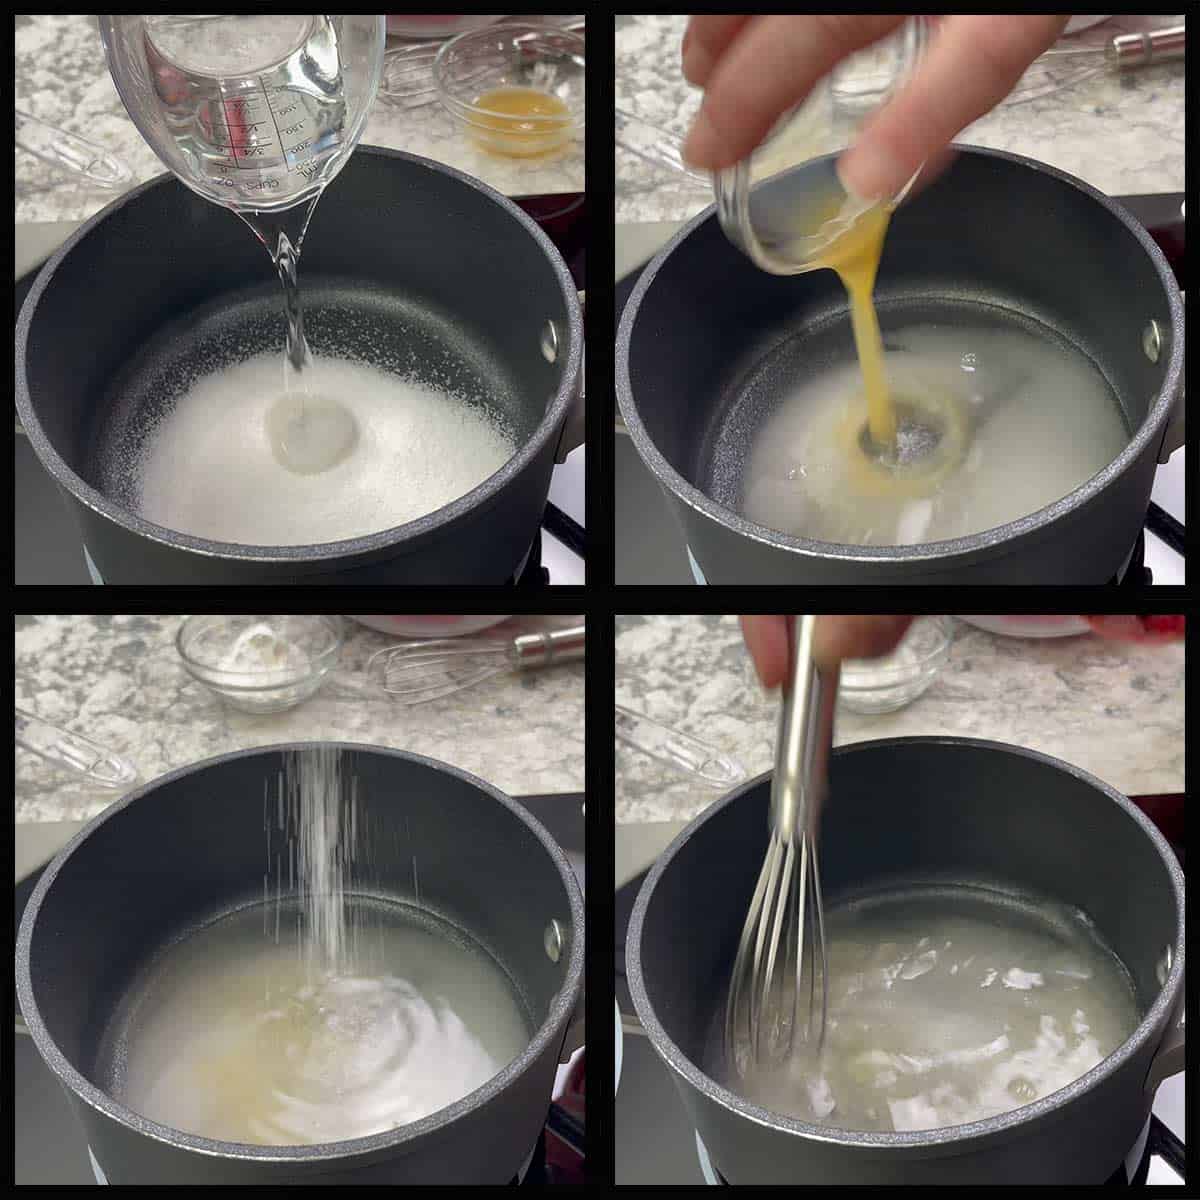
Put 1 cup of the whole milk or half and half into a small saucepan and add a pinch of salt. Stir and heat over medium-low to bring it to a simmer. You do not want to boil the milk.
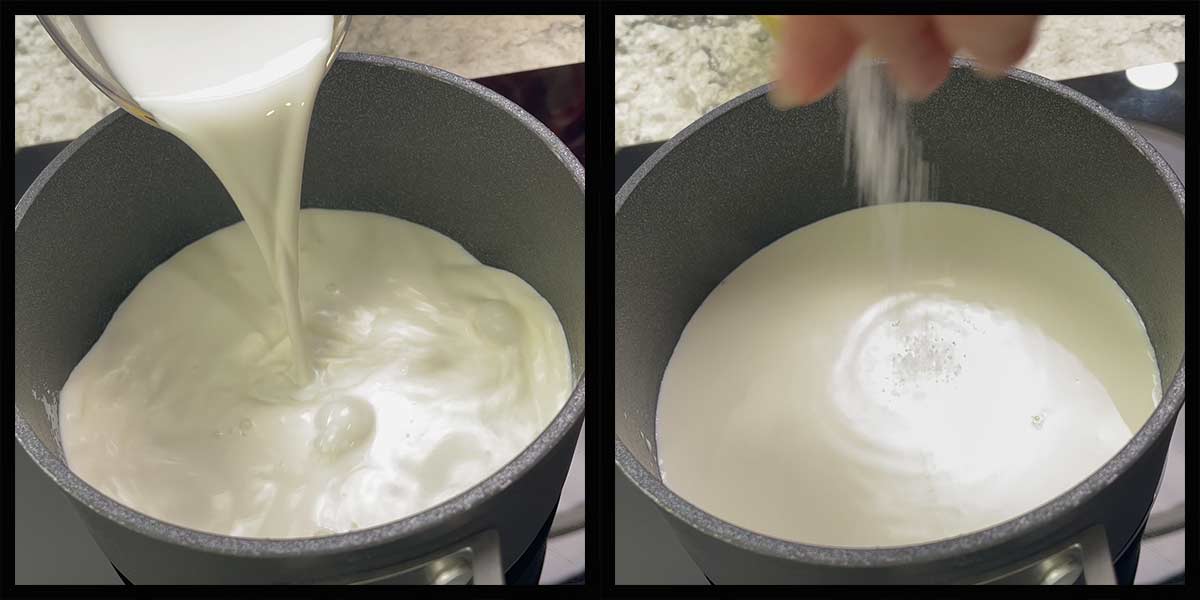
In a separate small mixing bowl, add the egg yolks, sugar, the remaining ¼ cup of milk/half and half, and the cornstarch. Whisk until well combined, making sure it is very smooth and no lumps are present.
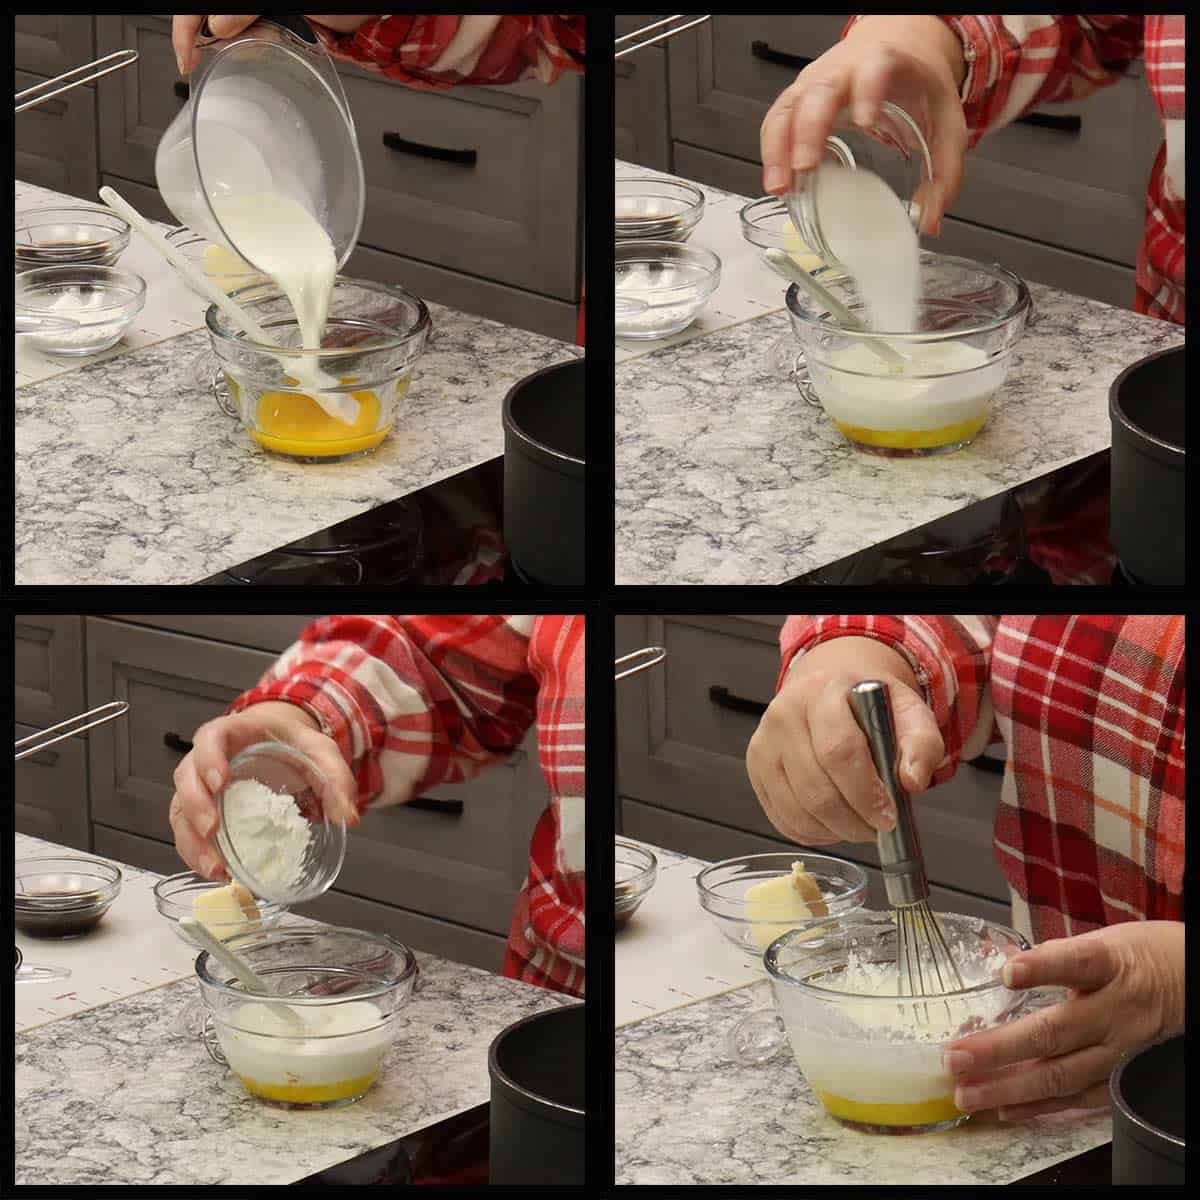
When the milk comes to a simmer, pour about ¼ cup into the mixing bowl with the eggs, milk, and cornstarch and whisk to combine. This will temper the eggs so they don't turn into scrambled eggs when you add the mixture to the hot milk.
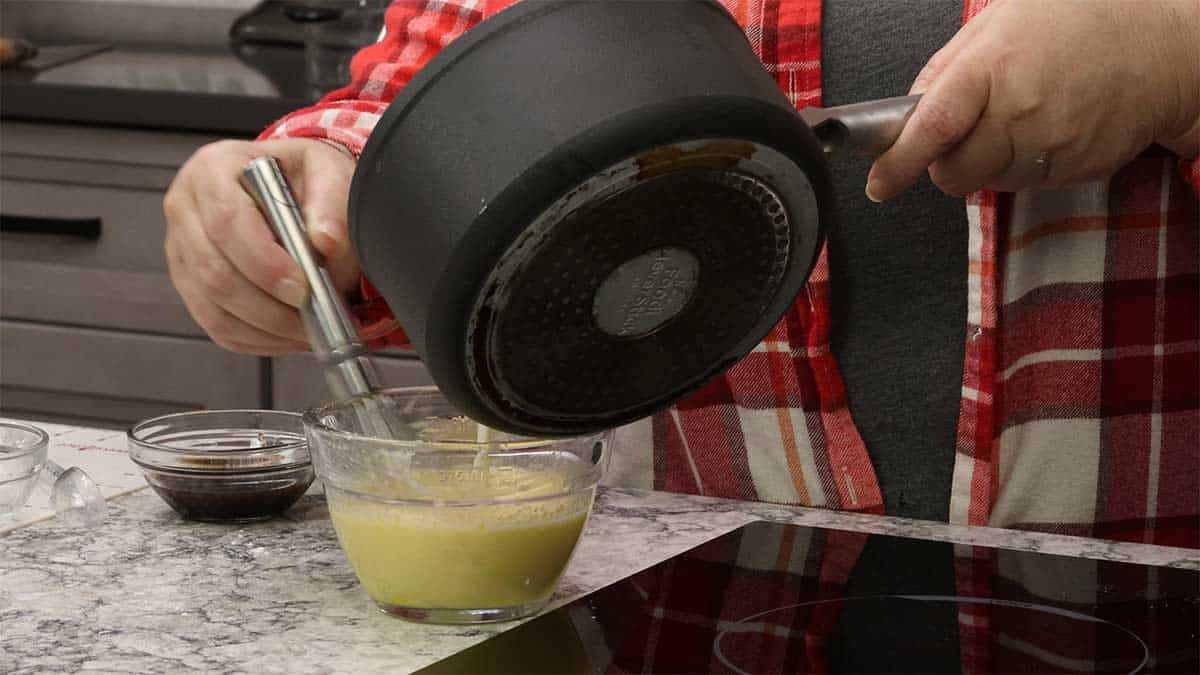
Return the pot of milk to the stove on medium heat. Slowly add the egg mixture while whisking constantly until the sauce begins to thicken. Once it starts to thicken, turn the heat to low or turn the stove off.
Continue whisking constantly; the pastry cream will continue to thicken, then add the butter and vanilla extract or paste and whisk until incorporated. The mixture should be the consistency of pudding.
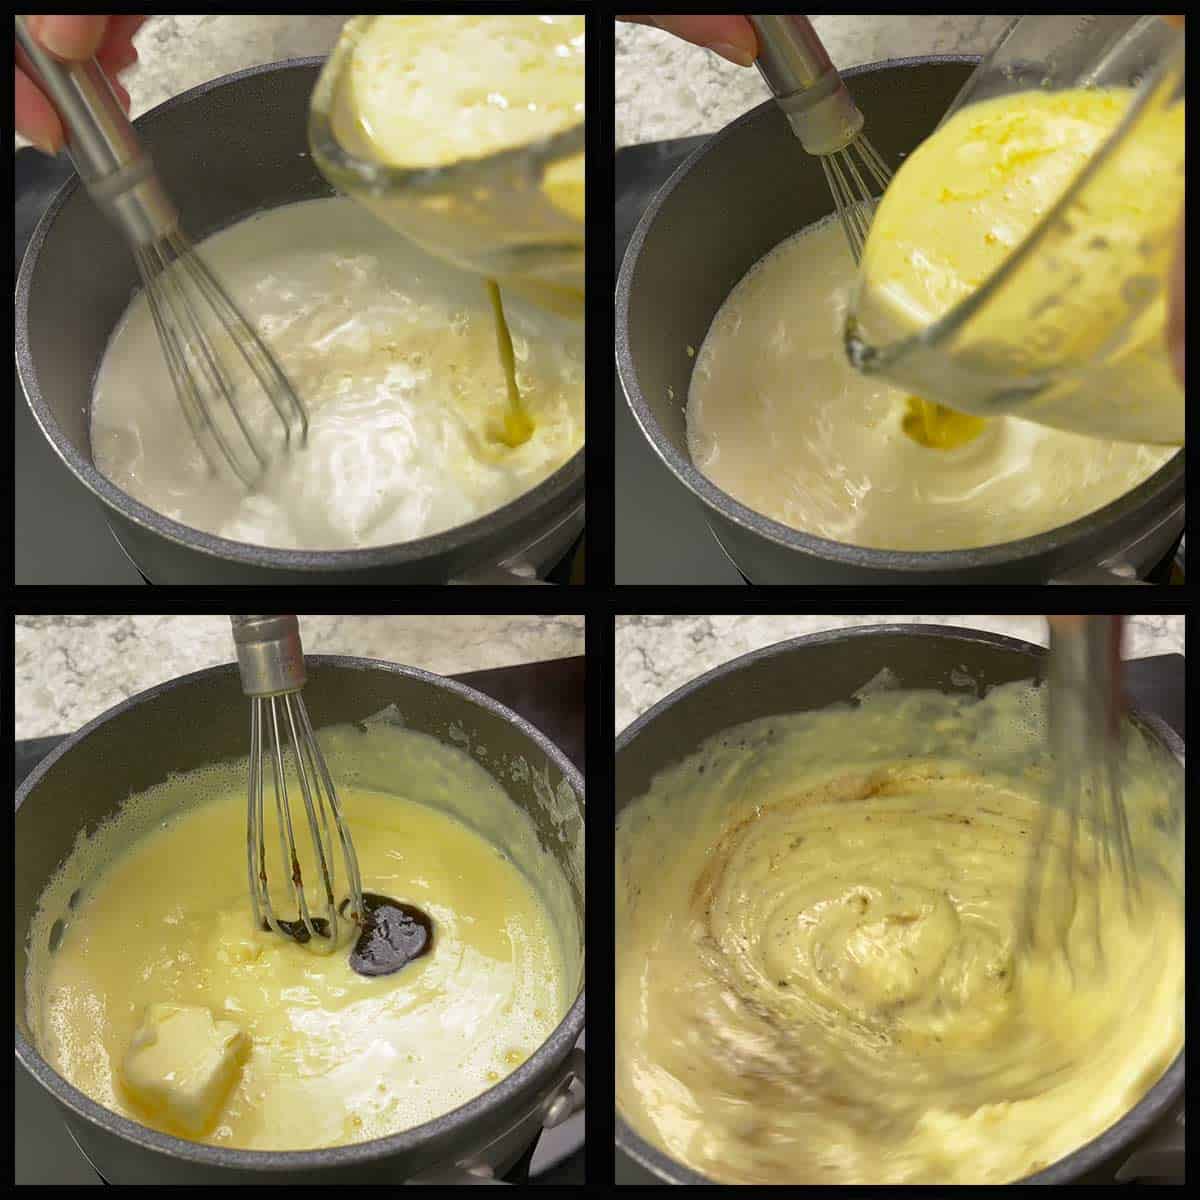
Transfer the pastry cream to a shallow dish. If you are concerned that you may have lumps in your pastry cream, you can pour it through a fine sieve strainer.

Cover the pastry cream with plastic wrap, making sure the plastic wrap comes in contact with the pastry cream so it doesn't develop a skin.
Refrigerate at least 4 hours.
Quick Tip
To quickly chill the pastry cream transfer it to a metal cookie tray and refrigerate uncovered for 15 minutes. The increased surface area will chill the cream quickly. Don't leave it longer than 15 minutes or it will start to develop a skin on top. You can transfer it to a covered container after the 15 minutes if you are not ready to use it yet.
Baking the Puff Pastry
The puff pastry can be baked 1-2 days ahead of time, but even when stored correctly, they do soften some. They are still delicious, but I like them better when they are made the day they are being served.
How you bake the puff pastry depends on what you buy and how you want to shape them.
If you purchased puff pastry shells, simply bake them according to the package directions.
You can also take a shortcut and roll out a sheet of puff pastry to about ¼" thick and cut it into large squares or rectangles and then bake it in the oven according to the package instructions and have flat pastry on which to put the cream and strawberries.
I like the way the pastry bowls look so this is how I make them.
I use a (affiliate link)jumbo muffin tray from Pampered chef, but you can use a smaller muffin pan and make smaller pastry puff bowls.
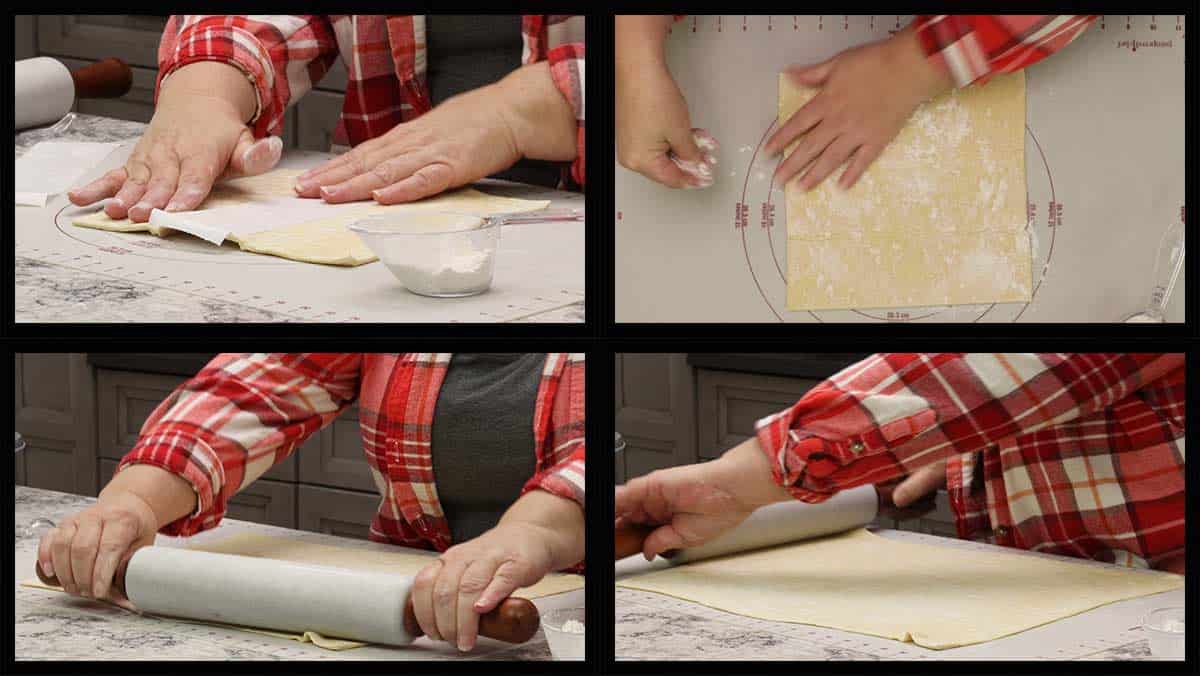
Before rolling out the puff pastry, you want it to thaw almost all the way. I usually take it out of the freezer 3-4 hours before using and leave it in the box on the counter to thaw.
Just before you are ready to bake the puff pastry, preheat the oven to 400℉/200℃.
Roll out the puff pastry on a lightly floured work surface to about 12" x 18" (31 cm x 46 cm). You can add a little flour to the top of the puff pastry so it doesn't stick to the rolling pin.
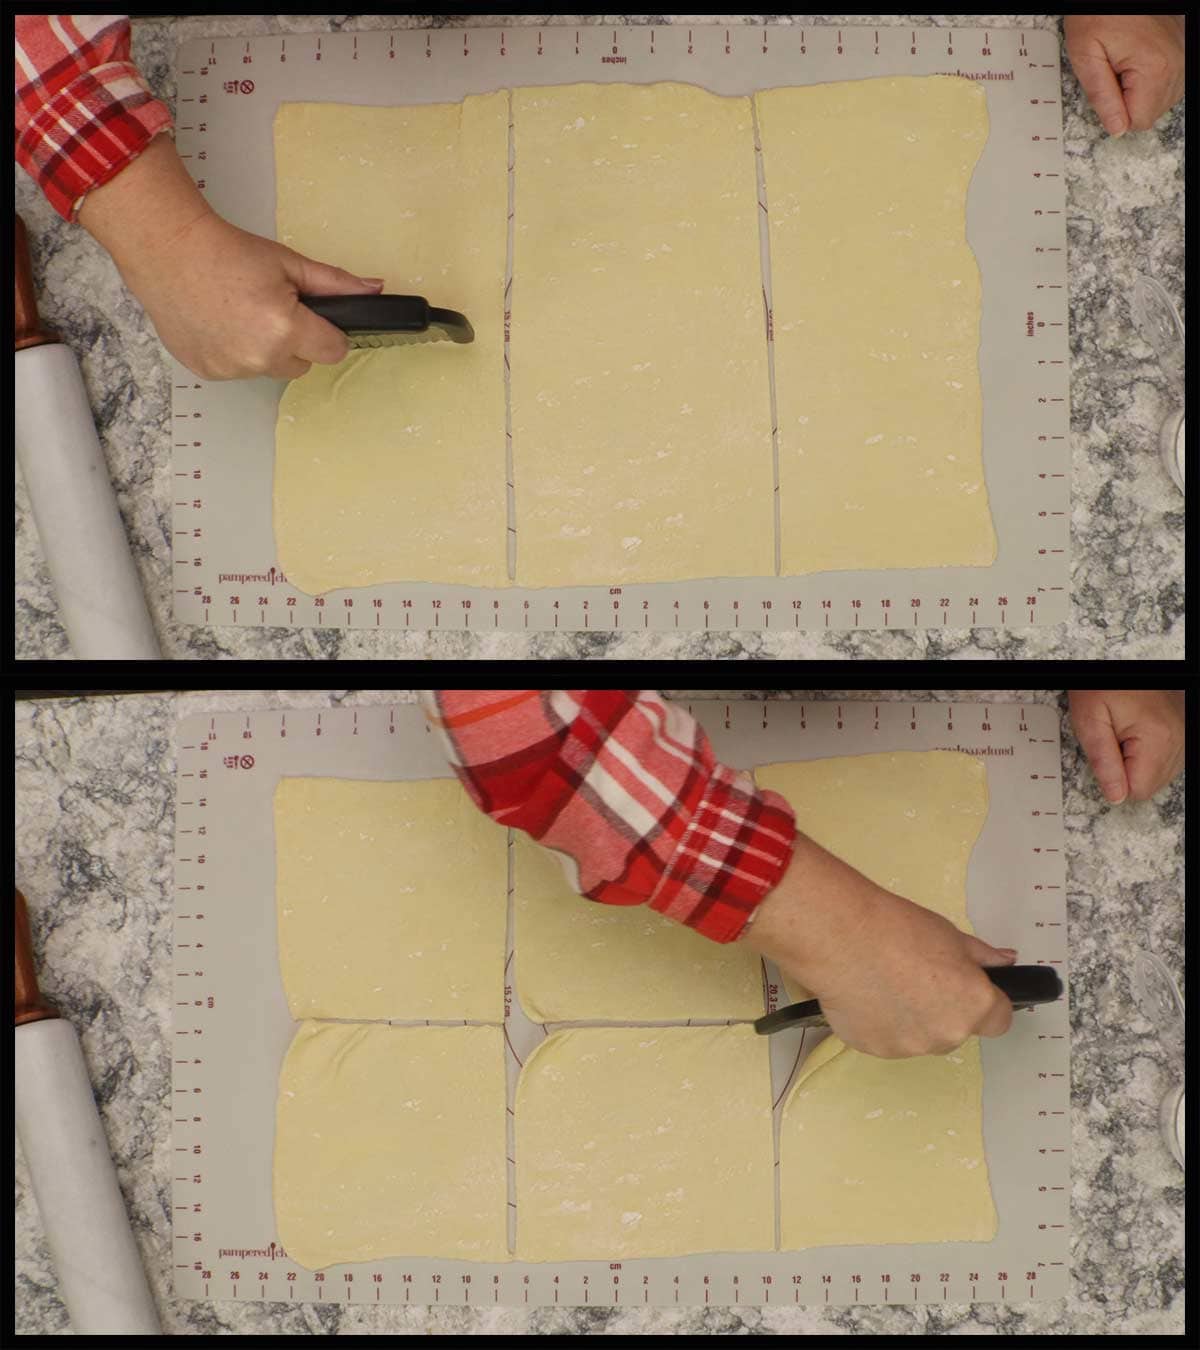
Cut the puff pastry into 6 equal sections if using a jumbo muffin pan and 12 equal sections if you are using a 12-well muffin pan.
Turn the muffin tin over so you can drape the puff pastry over the wells to create the bowls. Lightly press the pastry around the cup. There will be excess draping onto the pan and that is fine. As it bakes, it will shrink.
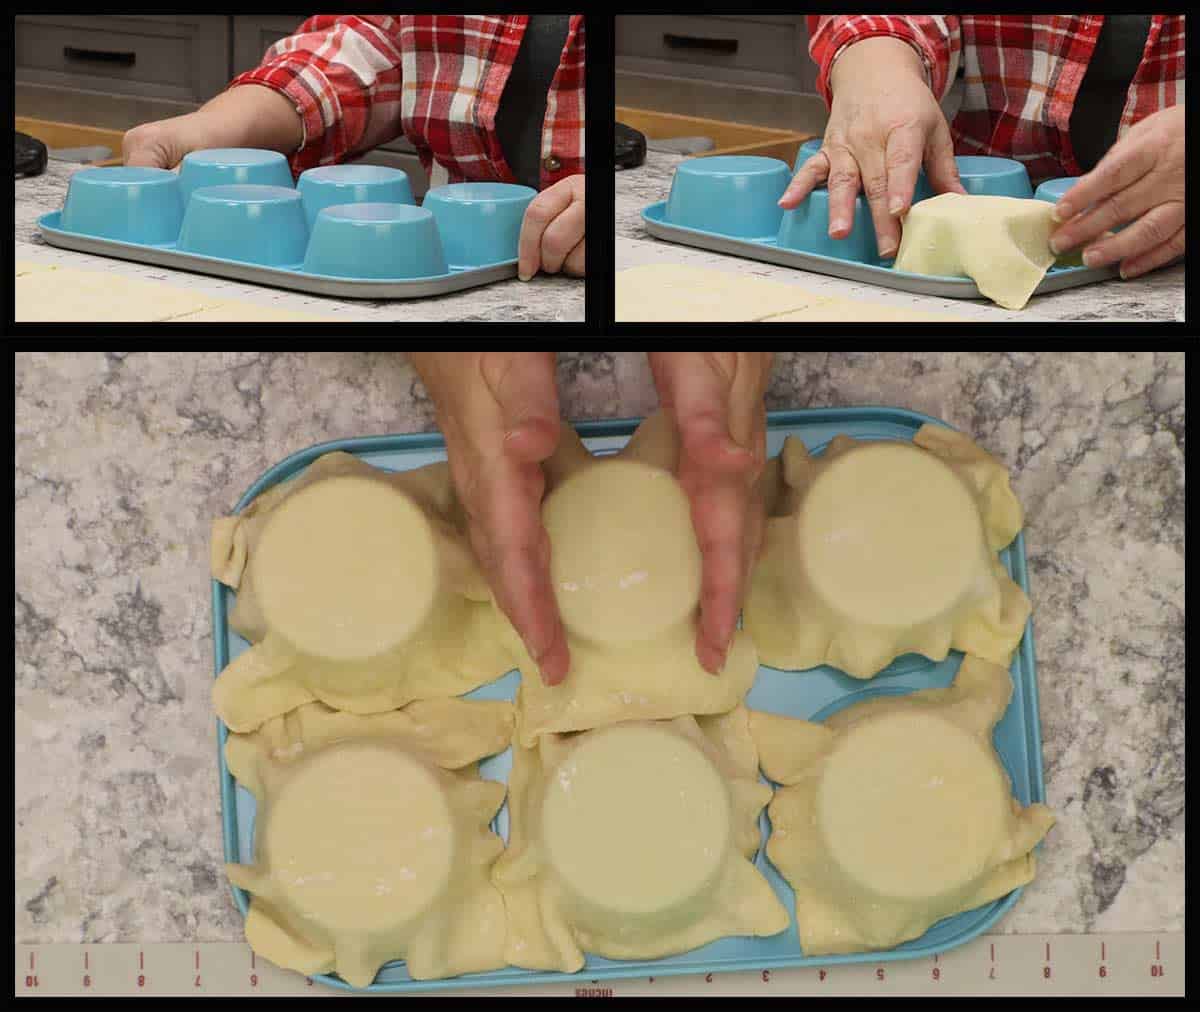
Place a piece of parchment over the top of the puff pastry and cover with a sheet pan or cookie tray. This prevents the bottoms from puffing up and allows them to sit flat on your plate.
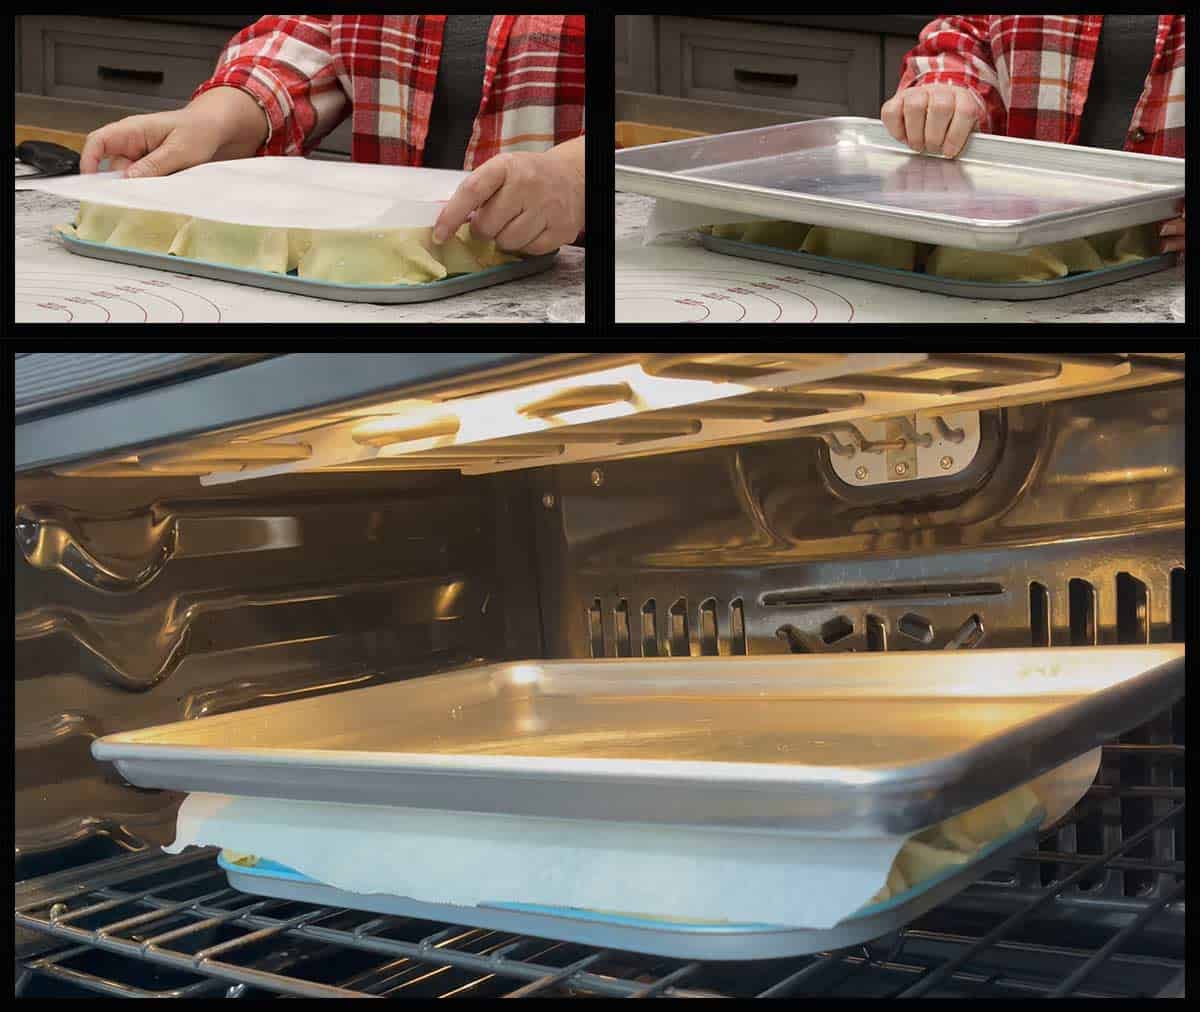
Place the tray on the middle rack of the preheated oven and bake for 10 minutes. Remove the tray and parchment and continue to bake another 3-5 minutes or until the puff pastry is golden in color.
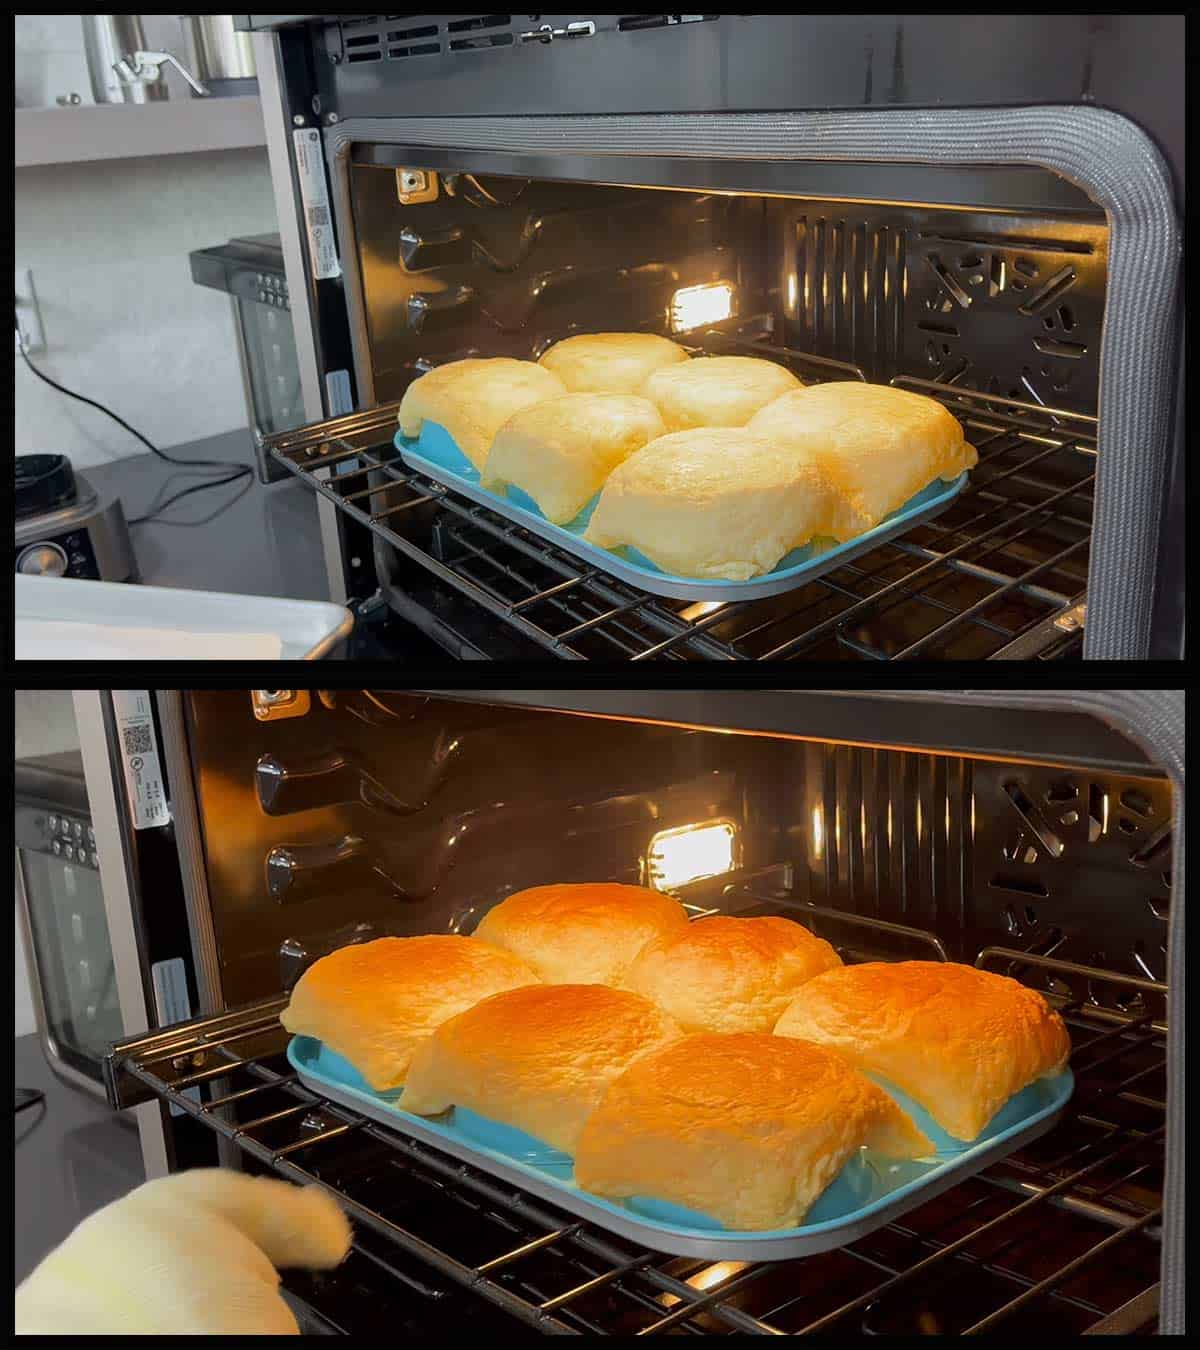
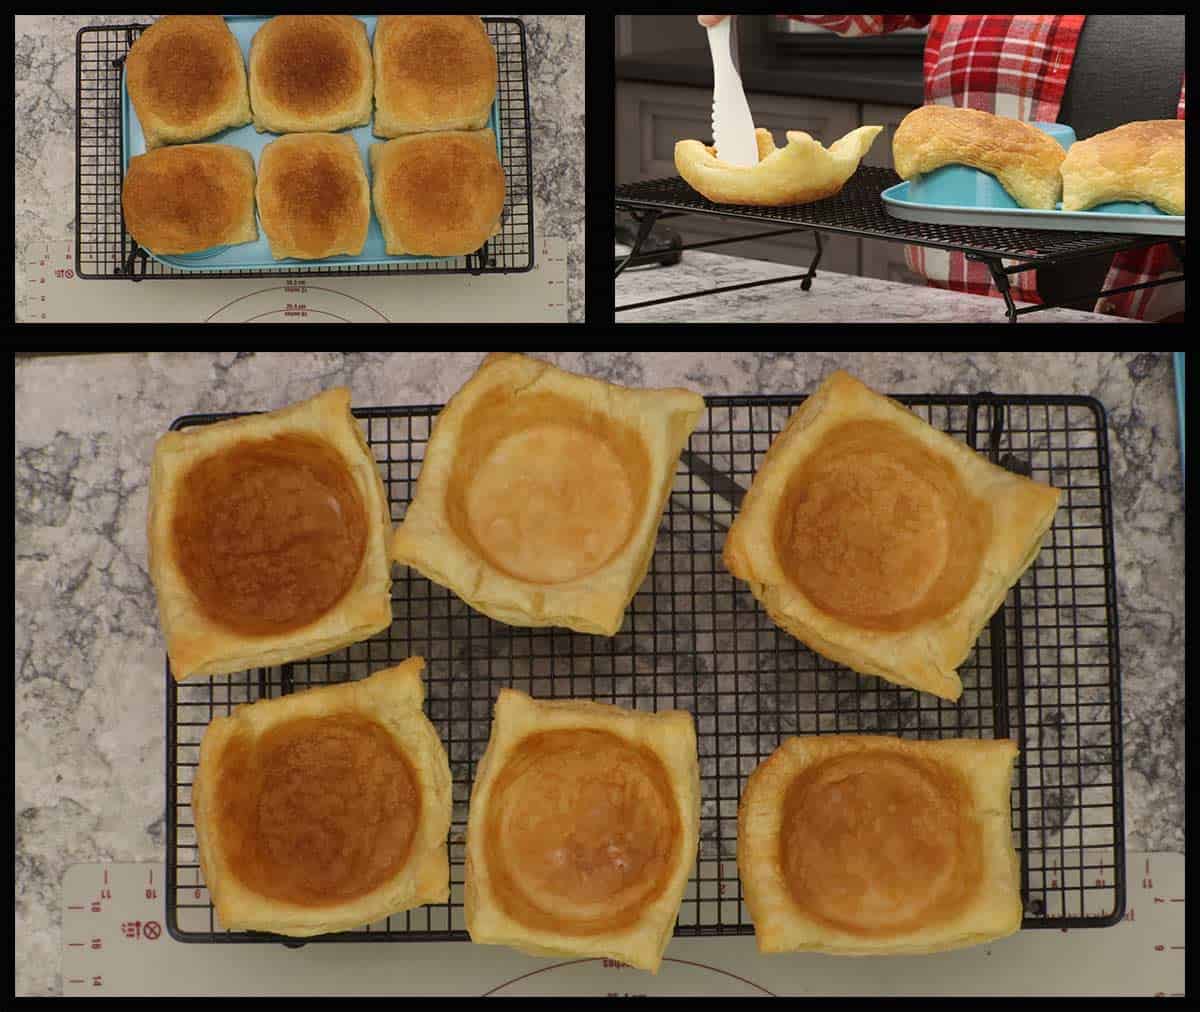
Remove the muffin pan and carefully remove the puff pastry and turn it over on a cooling rack to cool completely.
They can sit at room temperature until you are ready to serve them. If your house is really humid, you probably want to cool them for an hour and then store them in a sealed container or in a cold oven until you want to fill and serve them.
Making the Glazed Strawberries
The glazed strawberries can be made a day or two ahead of time, but they retain their color and texture if you make them within a few hours of serving.
You can use fresh or frozen strawberries. I usually use frozen and measure out 12 ounces and put them in large mixing bowl. I let them sit on the counter while I make the glaze in a small saucepan on the stove.
Add the sugar, water, salt, and lemon juice to a small saucepan and heat over medium-high heat to melt the sugar. Stir occasionally. This only takes 2-3 minutes.
While the water is heating and melting the sugar, prepare the cornstarch slurry.
Mix 1½ Tablespoons of cornstarch with 2 Tablespoons of water and make sure it is smooth and free of clumps.
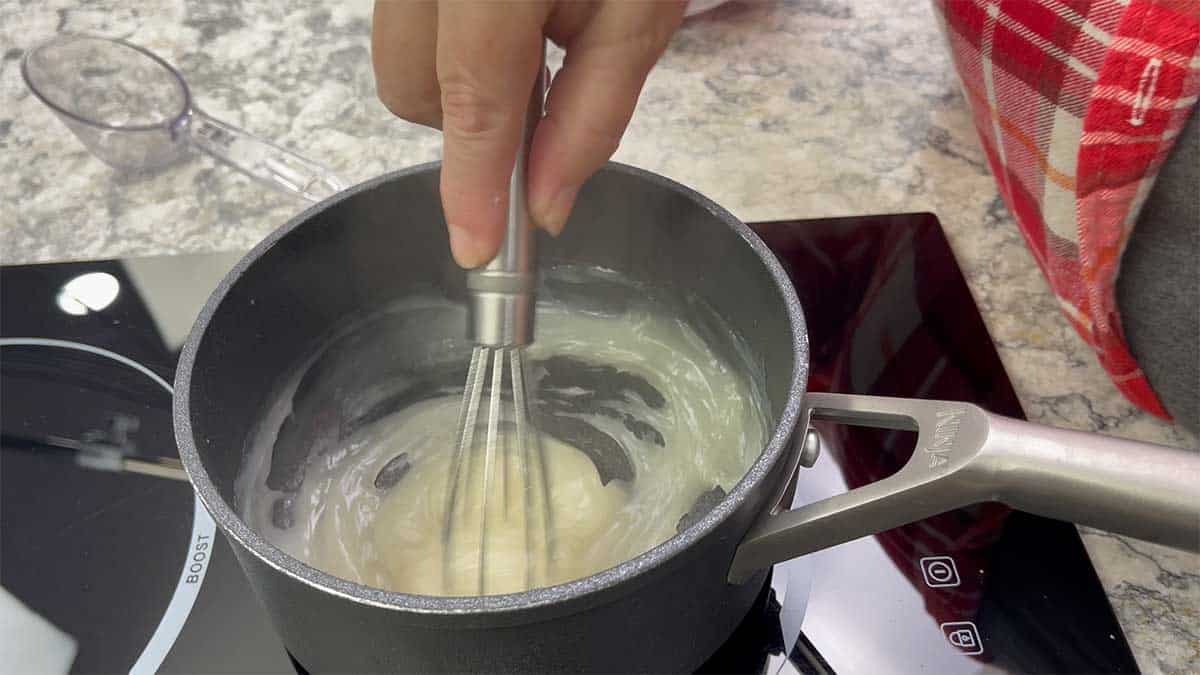
When the sugar is melted and the mixture is simmering, pour in the cornstarch slurry and whisk together.
This part moves very fast so whisk constantly as the mixture thickens. When it is about the consistency of thick custard, turn the heat off and continue to whisk.
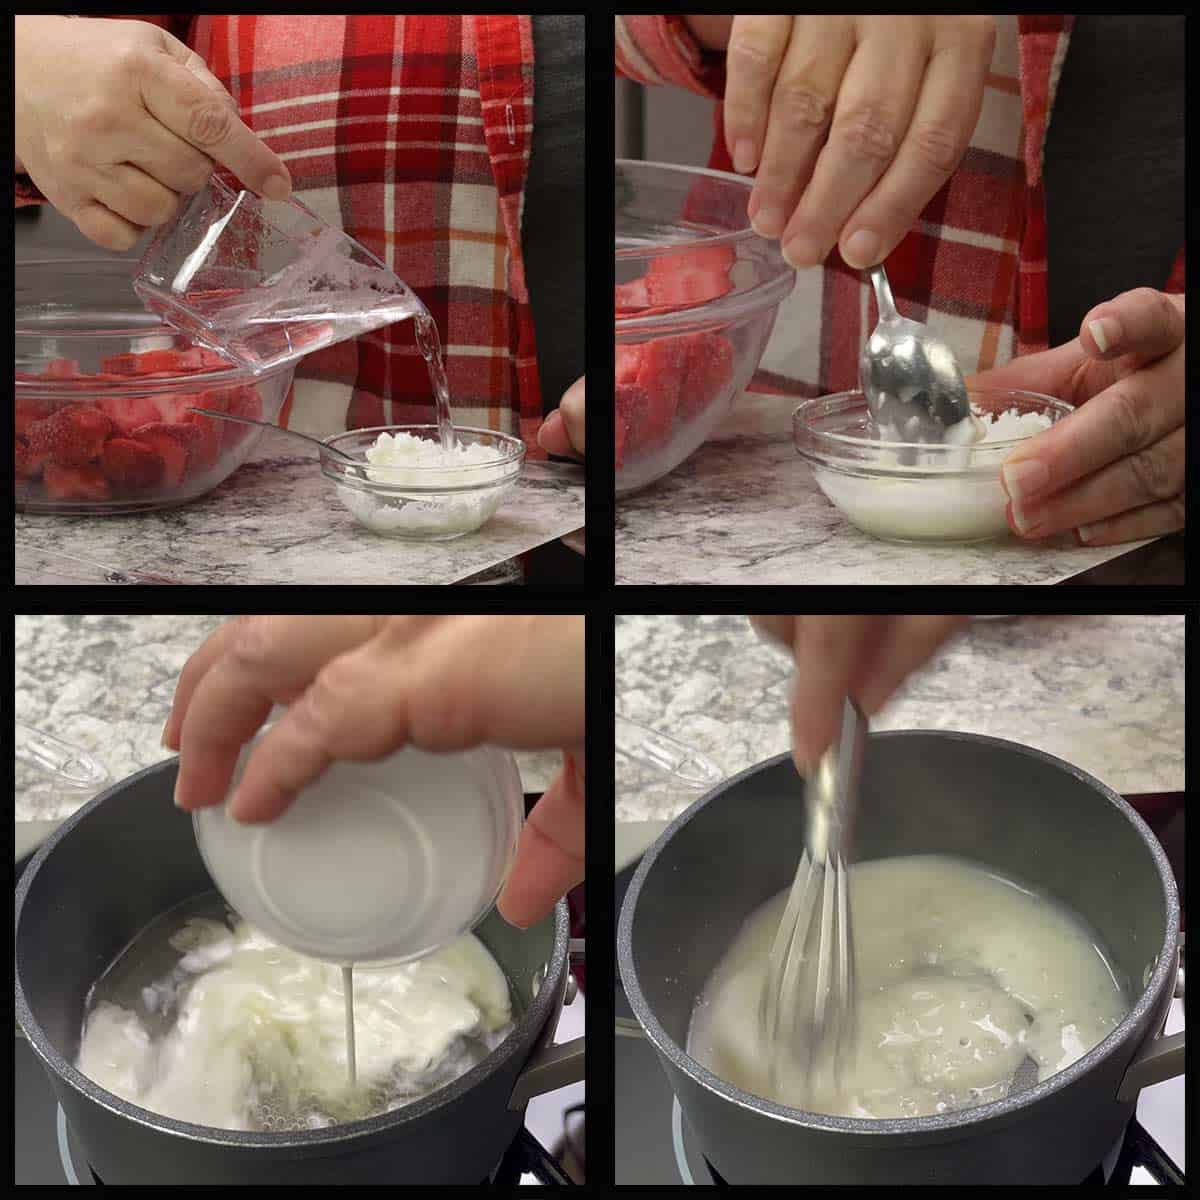
The mixture will turn from white to opaque and continue to thicken until it is paste-like. I keep it thick so that when it mixes with the juices from the strawberries, it becomes the perfect glaze consistency.
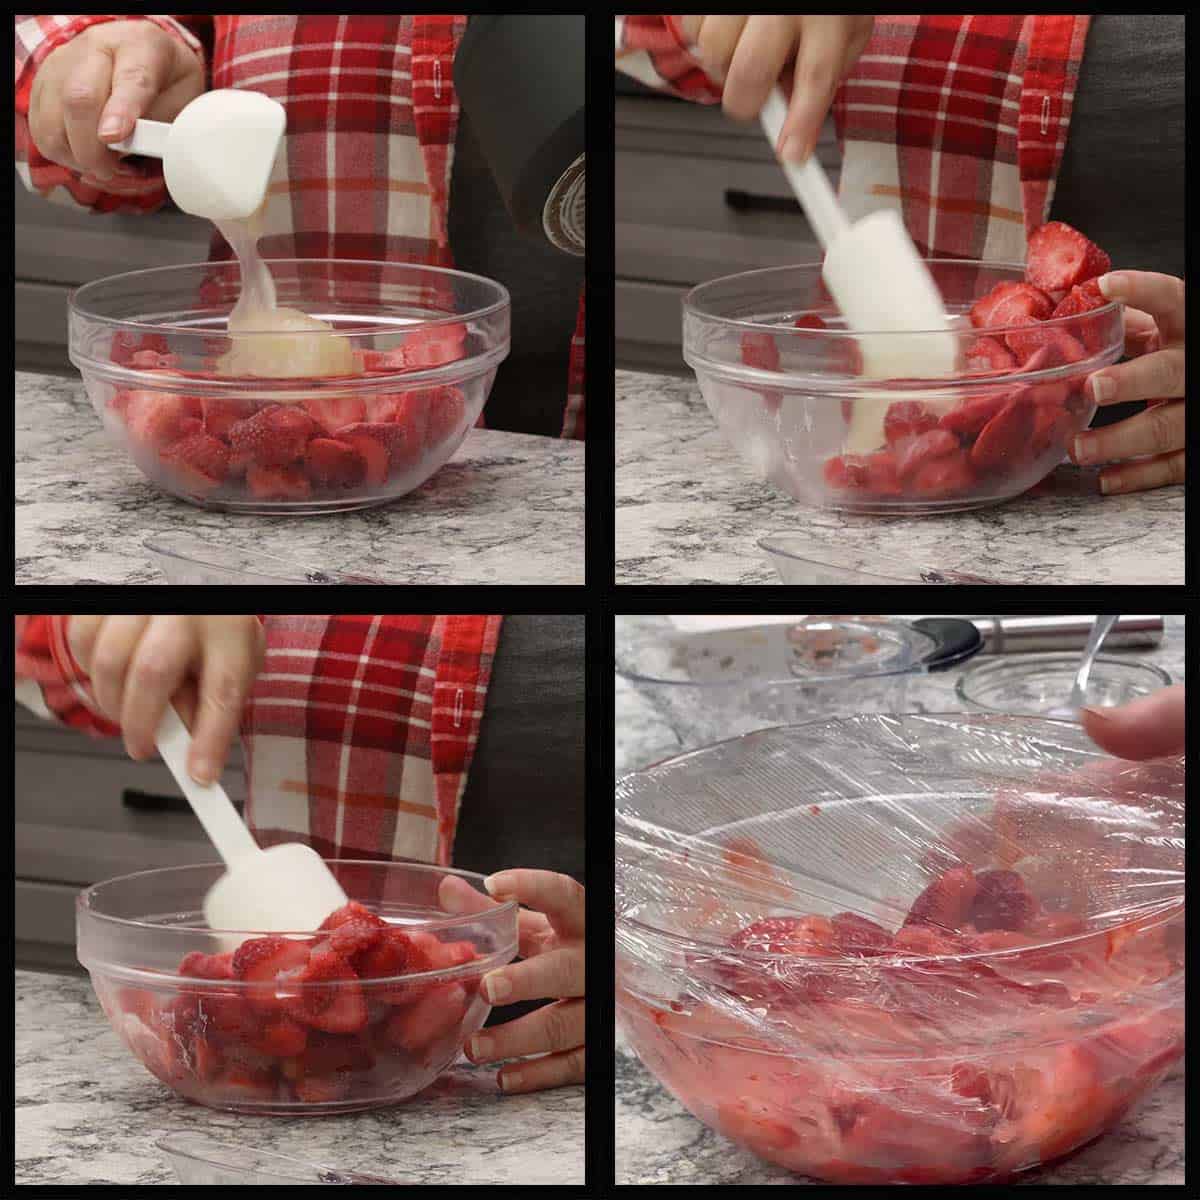
Transfer the thickened glaze to the bowl of strawberries and mix to combine. If you are using fresh strawberries, you can add a touch of water to thin out the glaze if needed.
Cover with plastic wrap and leave them at room temperature if the strawberries are frozen or refrigerate until serving if they are fresh strawberries.
Quick Tip
If your glaze appears clumpy after the strawberries sit for couple of hours, add a few tablespoons of water and mix everything together. This will smooth the sauce out.
Making the Chantilly Cream
You can make the Chantilly cream a day before you want to serve it and make sure it is refrigerated in a covered container.
Chantilly Cream is made with heavy cream, a little confectioner's sugar, and either vanilla paste or vanilla extract. I prefer vanilla paste because I love seeing the specks of vanilla in cream.
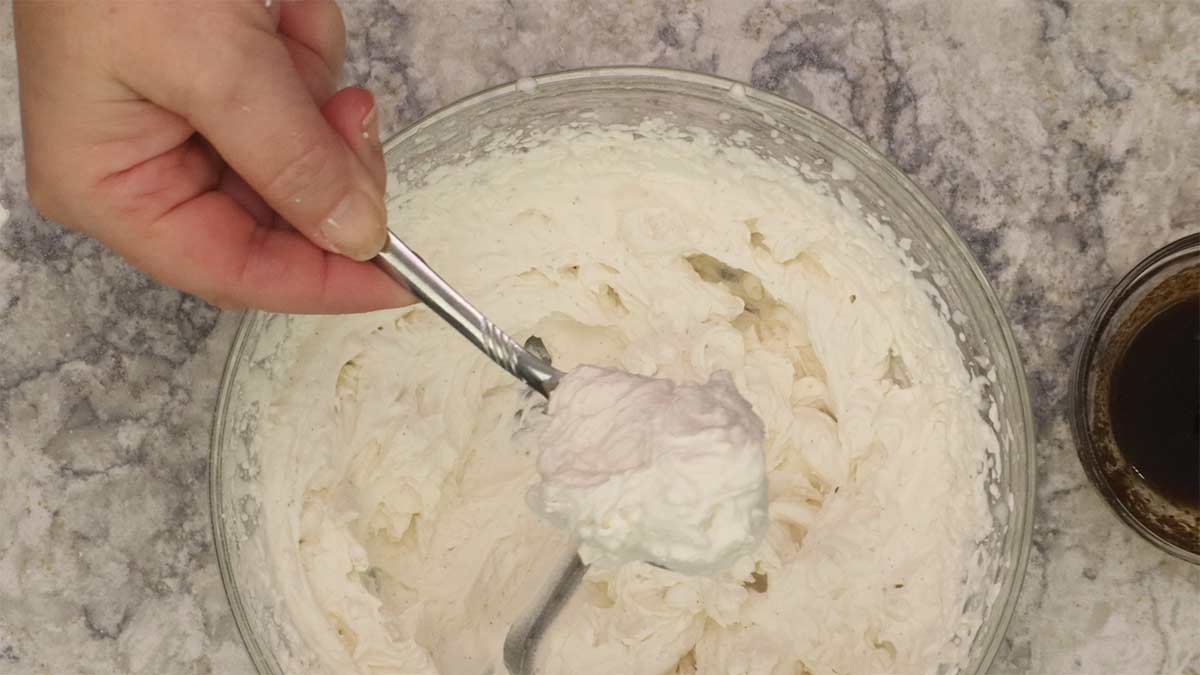
Add 1 cup of heavy cream to a large mixing bowl or the bowl of a stand mixer. I prefer to use my KitchenAid mixer with the whisk attachment, but this time I used my hand-held electric mixer.
Start out on low speed so you don't splash the cream everywhere and mix until it just starts to thicken. Add in the sifted confectioners sugar. You can add 2-3 Tablespoons depending on how sweet you like your whipped cream. I usually use 2 Tablespoons.
Increase the speed to medium and add the vanilla extract or paste. Once that is incorporated, increase to the highest speed and beat the mixture until it is fluffy and light.
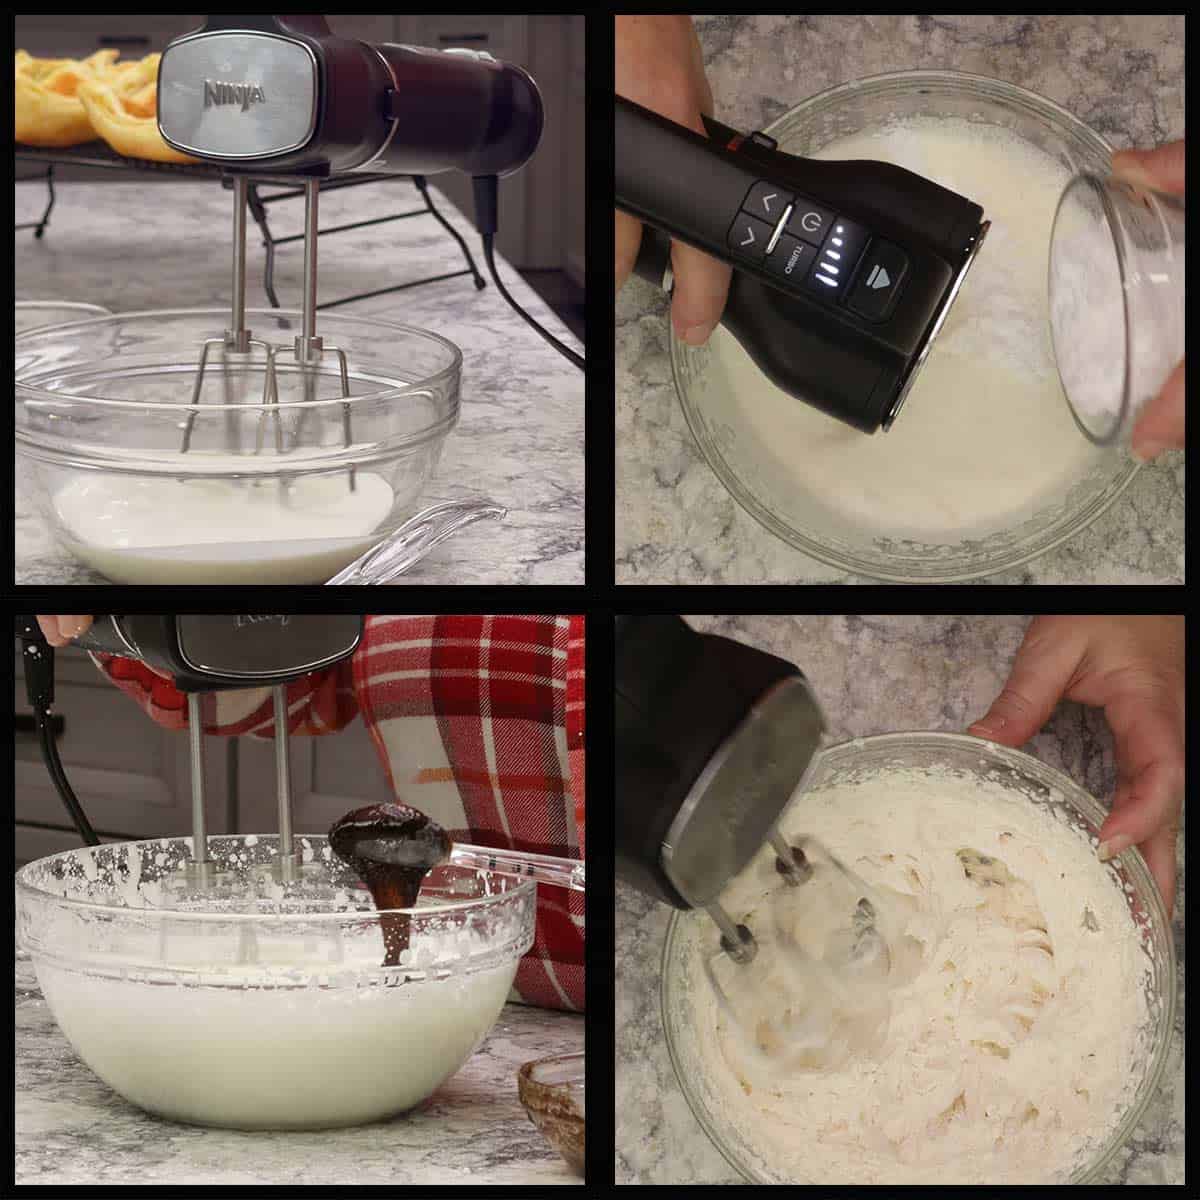
Be careful that you don't beat it too long or it will start to thicken too much and start to separate as it turns into butter.
Once it is done, cover and refrigerate until use.
How to Assemble the Strawberry Chantilly Puffs
You can assemble the desserts up to an hour before serving and they will stay fresh and delicious.
One thing I like to do is combine some of the Chantilly cream with the pastry cream to create what is called diplomat cream. This lightens everything up and pairs so well with the puff pastry.
To do this, put ½-1 cup of the Chantilly cream into the pastry cream and fold until it is uniform in color. This is completely optional and you can put the pastry cream as is into the base of the dessert.
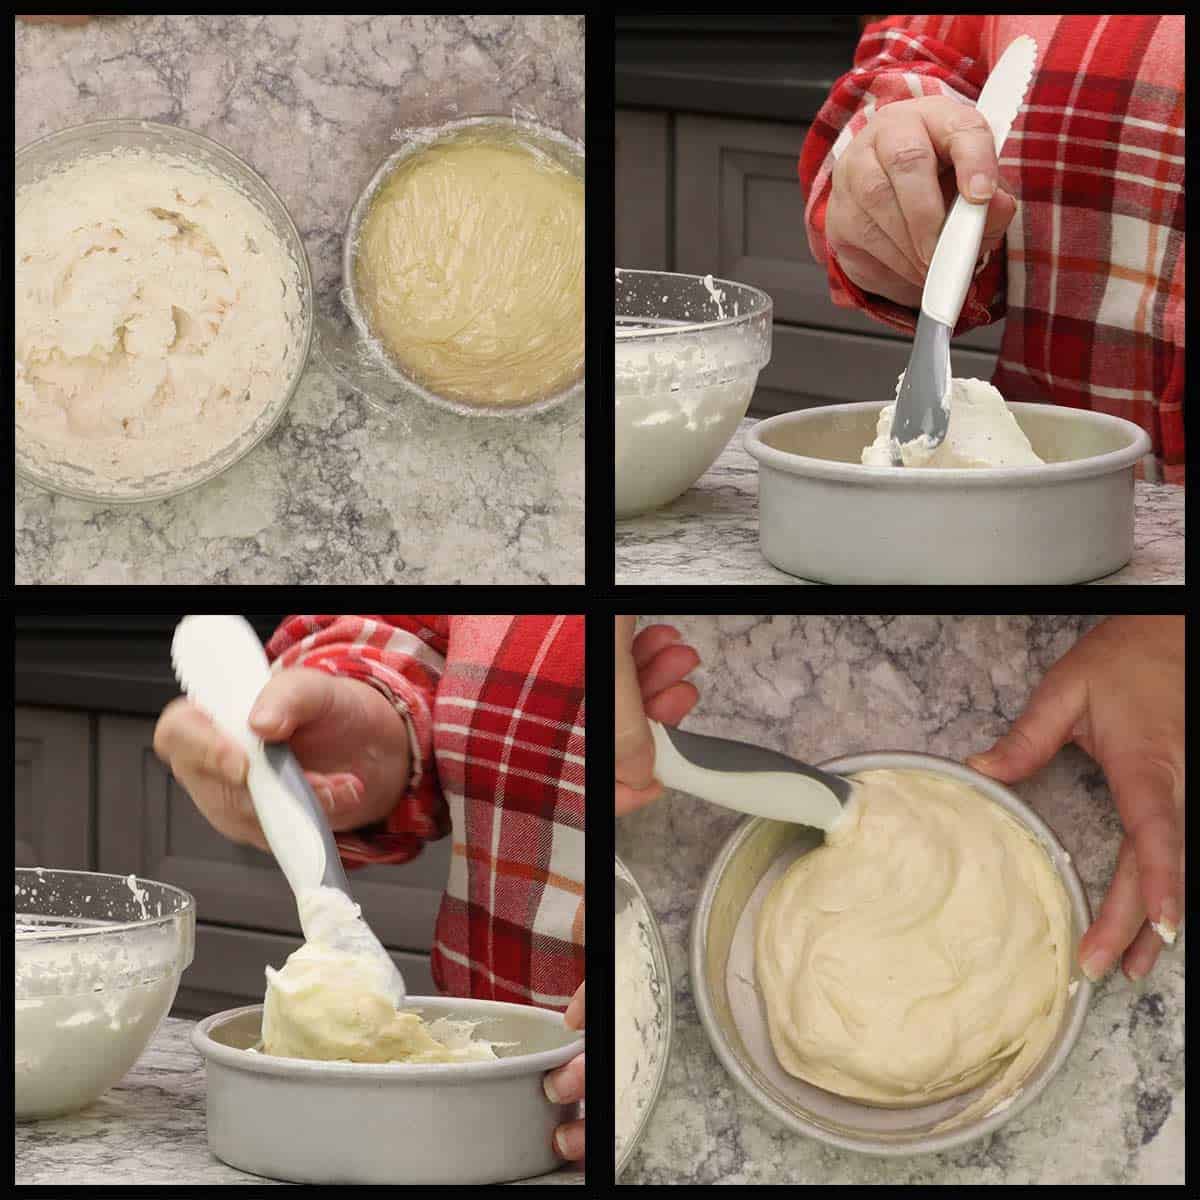
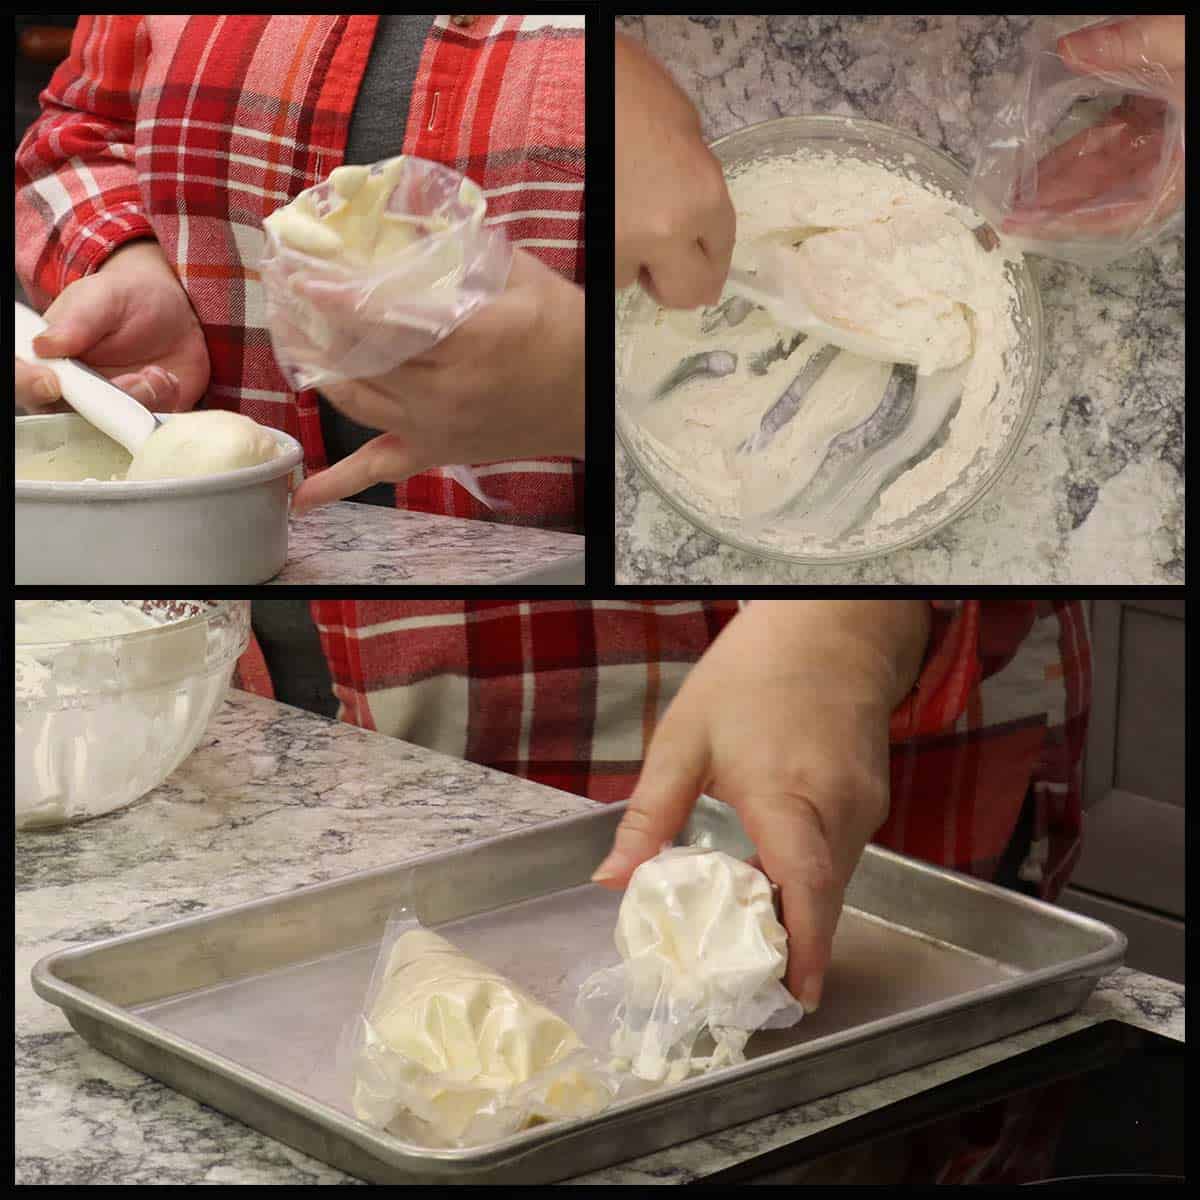
If you are having a dinner party and want to make the assembly super quick, then put the pastry cream into a pastry bag and the Chantilly cream into another pastry bag fitted with a large open star decorating tip. Place the bags on a tray and keep in the refrigerator until you are ready to assemble the desserts.
When you are ready to assemble and serve your strawberry Chantilly puffs, put each puff pastry bowl on a plate.
Fill the bottom with pastry cream, add a scoop of strawberries, and then top with the Chantilly cream.
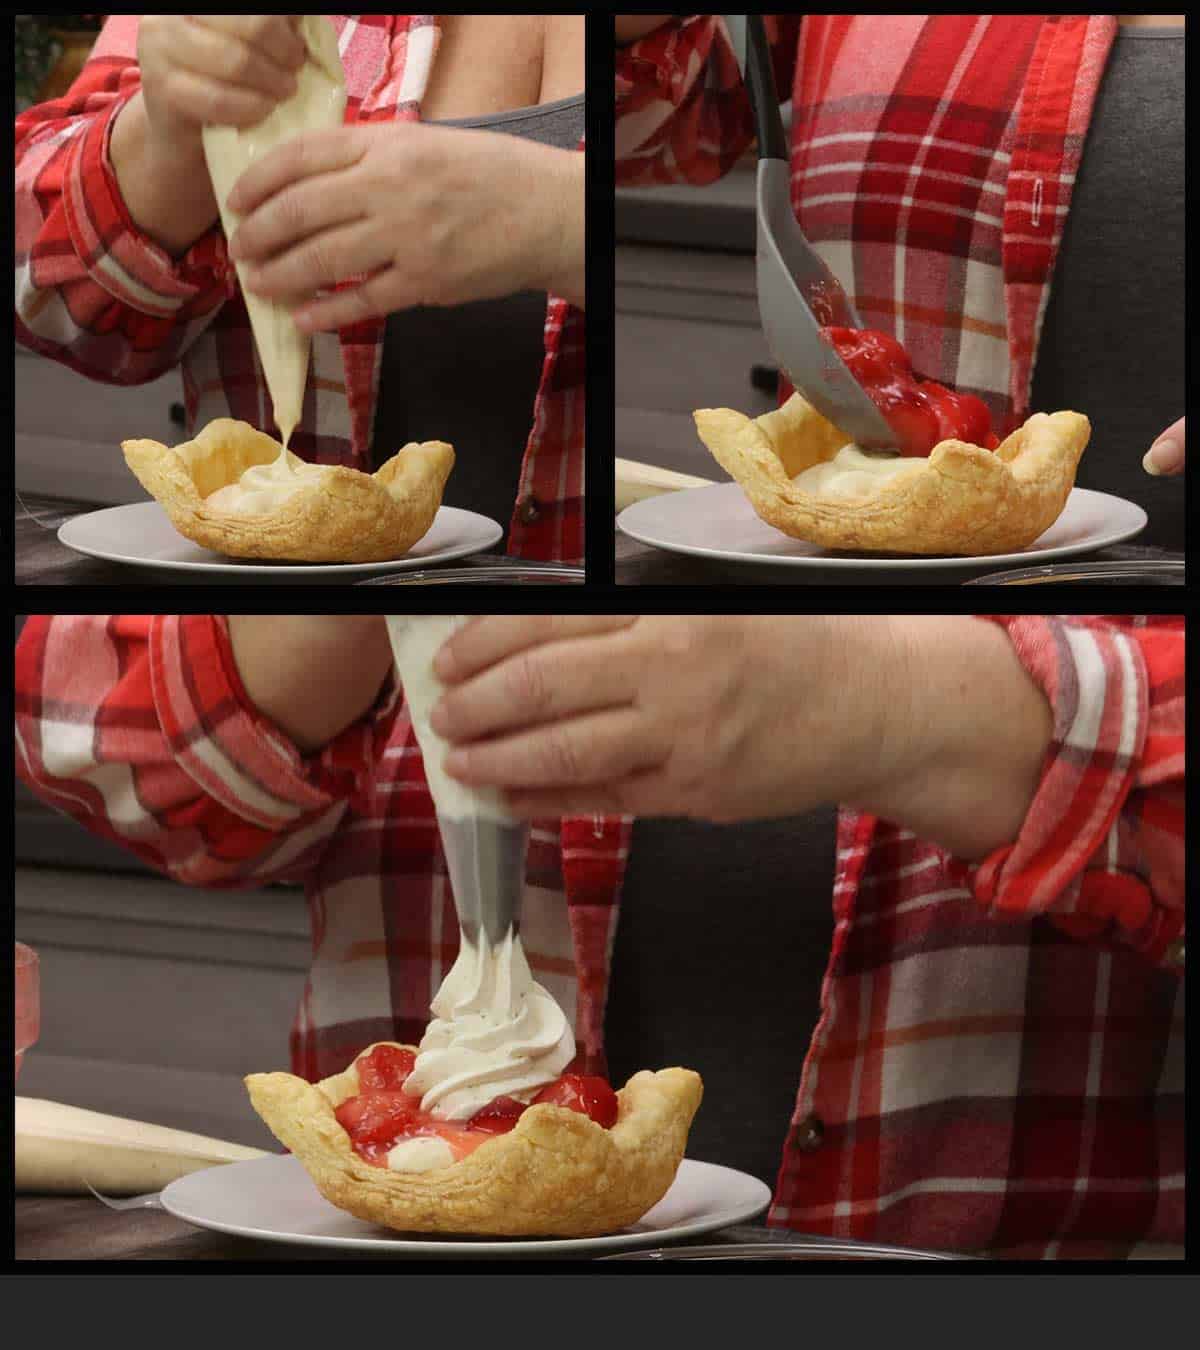
Serve and Enjoy!
Storage Instructions
How to Store Leftover Strawberry Chantilly Puffs
Only assemble as many as you are serving because they do not store well once assembled; however, you can store the individual ingredients.
Refrigeration
Glazed Strawberries: These can stay in the refrigerator for 2-3 days. They do change from a vibrant color to a duller color, but they are still delicious.
Pastry Cream: You can store the pastry cream for up to 3 days in a covered container.
Chantilly Cream: This will stay fresh and light for 1-2 days, after that it starts to break down and become thinner in texture. Store in a covered container.
Puff Pastry Shells: I do not recommend refrigerating them. They can be stored in an airtight container at room temperature for 1-2 days.
Freezer
Glazed Strawberries: You can put the glazed strawberries in a freezer container and freeze for up to 6 months.
Pastry Cream: You can store the pastry cream in the freezer for a few months, but the texture will be thinner when thawed.
Chantilly Cream: I don't recommend freezing the cream, the texture changes too much when thawed.
Puff Pastry Shells: Once completely cooled, you can package the puff pastry and freeze it for several months. I would wrap each one in plastic wrap and then in foil and the place in a sealed freezer bag.
Dessert Recipes
Here are some family favorites!
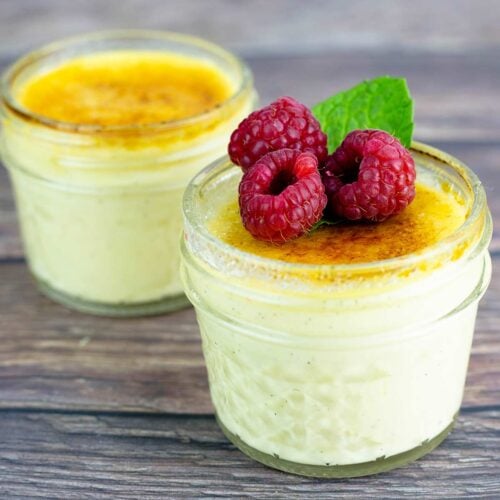
- Sous Vide Crème Brûlée
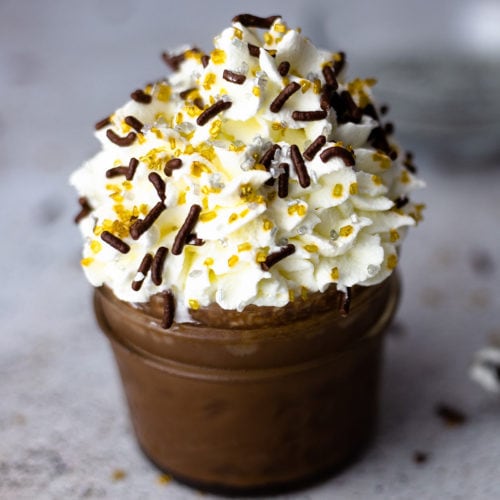
- Chocolate Pot De Crème in the Ninja Foodi
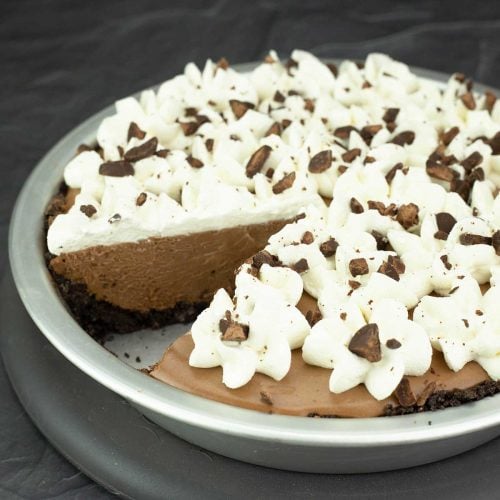
- No-Bake Chocolate Mousse Pie
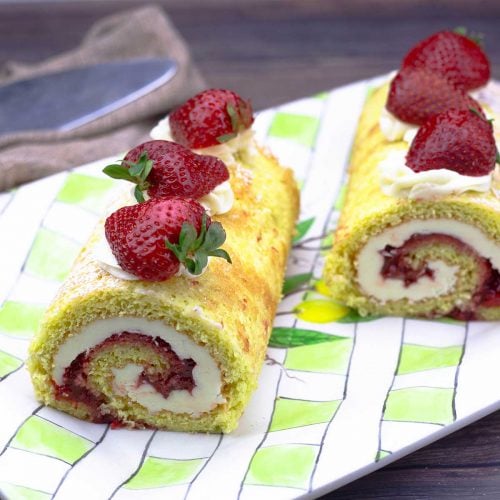
- Strawberry Roll Cake ~ Ninja Foodi Digital Oven or Regular Oven
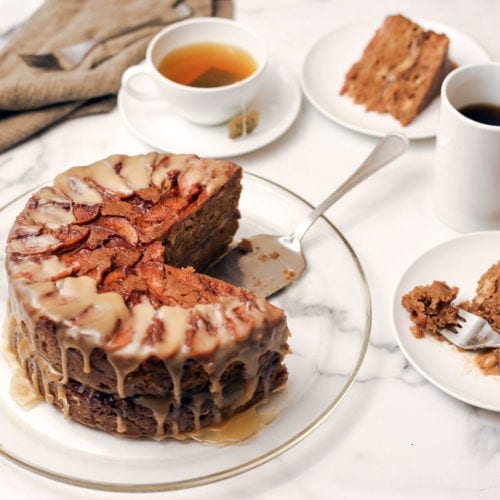
- Ninja Foodi Apple Cake with Caramel Glaze
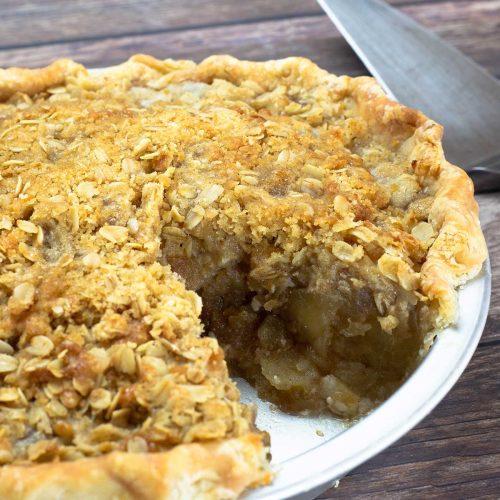
- 10-Minute Apple Pie ~ Ninja Foodi Recipe
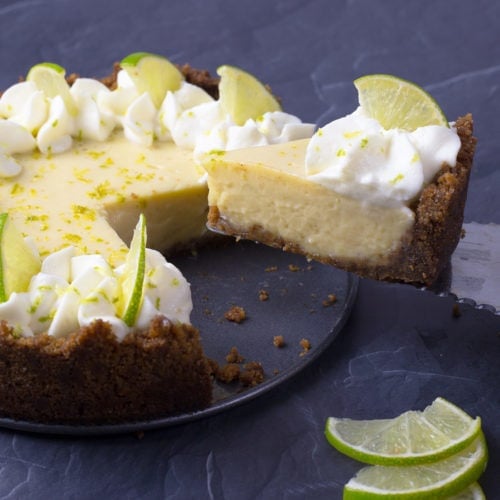
- Easy Key Lime Pie in the Ninja Foodi
- Banana Pudding with Meringue Topping
Strawberry Chantilly Puff Recipe
Ingredients
Puff Pastry Shells
- 1 sheet Puff Pastry thawed
Glazed Strawberries
- 12 ounces sliced strawberries frozen or fresh
- ¼ cup white sugar
- ¼ cup water Plus 2 Tablespoons for the cornstarch slurry
- 1 tsp lemon juice
- 1½ Tablespoons cornstarch
Pastry Cream
- 1¼ cup whole milk or half and half, divided in recipe
- ⅛ teaspoon kosher or fine grind sea salt
- 2 large egg yolks
- 3 Tablespoons white sugar
- 2 Tablespoons corn starch
- 2 Tablespoons butter
- ½ Tablespoon vanilla paste or vanilla extract
Chantilly Cream
- 1 cup heavy whipping cream
- 2-3 Tablespoons confectioners sugar sifted
- ½ Tablespoon vanilla paste or extract
Would you like to save this recipe?
Instructions
Puff Pastry Shells
- Preheat the oven to 400℉℉/200℃ and have the oven rack in the middle position.
- Roll out the thawed sheet of puff pastry on a lightly floured work surface so it is about 12" x 18".1 sheet Puff Pastry
- Cut six equal pieces. Turn a jumbo muffin pan over so the bottom of the pan is facing you and drape each piece of puff pastry over each well to form a cup. Gently press the pastry to the sides of the well.
- Cover the pastry with parchment and a large baking tray or cookie sheet pan to prevent the bottom of the puff pastry from puffing up. Place in the preheated oven on the middle rack and bake for 10 minutes.
- Remove the pan and the parchment and bake an additional 3-5 minutes or until the puff pastry is golden in color. Remove from the oven and pop the pastry bowls off of the muffin tin and place them on a cooling rack to cool.
Glazed Strawberries
- Place the frozen or fresh sliced strawberries in a medium size mixing bowl. The strawberries do not need to be thawed if they are frozen.12 ounces sliced strawberries
- Add sugar, water, and lemon juice to a small saucepan and heat over medium heat to melt he sugar and bring the mixture to a simmer.¼ cup white sugar, ¼ cup water, 1 teaspoon lemon juice
- Combine the 2 Tablespoons of water with the cornstarch and mix until smooth.1½ Tablespoons cornstarch
- When the sugar mixture is simmering, add the cornstarch slurry and whisk constantly until the glaze begins to thicken. Once it comes to a boil, turn the stove off and continue to whisk. The glaze will turn from white to opaque and become thick like paste.
- Transfer the glaze to the bowl of strawberries and mix to combine. The juices from the strawberries will combine with the thick glaze to make the perfect dessert topping. If you are using fresh strawberries, you can add a little water to thin the glaze out a bit. Cover and store at room temperature if the strawberries are frozen and in the fridge if they are fresh.
Pastry Cream
- Add 1 cup of the whole milk or half and half and salt to a small saucepan. Reserve the ¼ cup of milk for the next step. Heat over medium heat to bring the milk to a simmer. You do not want to boil it.1¼ cup whole milk, ⅛ teaspoon kosher or fine grind sea salt
- put the egg yolks into a small mixing bowl and add the remaining ¼ cup of milk, sugar, and cornstarch. Whisk until smooth.2 large egg yolks, 3 Tablespoons white sugar, 2 Tablespoons corn starch
- When the milk has started to simmer, pour about ¼ of a cup into the egg yolk mixture and whisk to combine. This will temper the eggs and prevent them from becoming scrambled eggs when you add this mixture to the hot milk.
- Return the saucepan of milk to the stove and bring it back to a simmer. Slowly pour in the egg mixture while whisking constantly. The pastry cream will begin to thicken.
- When it is thick, like a loose pudding, turn the stove off and add the butter and vanilla paste or extract. Whisk the butter and vanilla into the custard until incorporated.2 Tablespoons butter, ½ Tablespoon vanilla paste or vanilla extract
- Transfer the pastry cream to a shallow container. You can pour it through a fine sieve strainer if you are worried you may have some lumps. Cover with plastic wrap and make sure the plastic wrap touches the pastry cream so a skin doesn't form while chilling. Refrigerate for at least 4 hours before using.
Chantilly Cream
- Add the heavy cream to a large mixing bowl or the bowl of a stand mixer. Using a stand mixer (use the whisk attachment) or hand-held electric mixer begin beating the cream on low speed until you see it start to thicken slightly.1 cup heavy whipping cream
- Once it begins to thicken, add in the sifted powdered sugar and increase the speed to medium. Once the sugar has been incorporated, increase to high speed.2-3 Tablespoons confectioners sugar
- When it is the consistency of pudding, add the vanilla paste or extract and continue to beat on high speed until light and fluffy.½ Tablespoon vanilla paste or extract
- Cover and refrigerate until use.
Assembling the Strawberry Chantilly Puffs
- Place each puff pastry on a plate. Divide the pastry cream between the six puff pastry bowls. It should fill at least 1" of the bowl. Add about ¼-½ cup of the strawberry mixture and top with Chantilly cream. Serve immediately or within 1-2 hours for the best textures. Enjoy!
Nutrition
About the Recipe Author, Louise Long
Louise is a full-time recipe creator and food blogger @ The Salted Pepper. She has over 30 years of experience with cooking and recipe development. She owned a restaurant for several years and was a full-time RN until retiring to blog full-time.

She published her first cookbook in the Fall of 2018 and is very interested in writing several more.
Louise is also the creator of an online Ninja Foodi Pressure Cooking Course with over 100 instructional step-by-step videos. People absolutely rave about the course and all the value they have received from it.
Louise has several very active Facebook groups that help people with the basics of cooking and learning more about the appliances they love.
Ninja Foodi Pressure Cooker & Air Crisper 101
Ninja Woodfire Outdoor Grill & Smoker
Louise is also a YouTube creator and you can find most of her recipes in video format on The Salted Pepper YouTube channel.
She is very responsive to messages and eager to help in any way she can. Get more Information about Louise & contact information
I WOULD LOVE TO SEE WHAT YOU ARE COOKING UP IN YOUR KITCHEN! TAG ME @THESALTEDPEPPER ON YOUR FAVORITE SOCIAL MEDIA PLATFORM WHEN YOU MAKE A DISH!
BE SURE TO FOLLOW THE SALTED PEPPER RIGHT HERE ⇓⇓⇓⇓⇓
Leave a Reply